Saturday, November 30, 2013

STAMP SALE; Suede Snow Christmas card

Sunday Stamp Sale!!!
All brands
   
Enter coupon code 
STAMPS17
 at checkout for 

17% off stamps from these fine companies!
 Sale begins at midnight CST tonight!  
This sale lasts from 
12AM CST on Sunday, December 1 
until 11:59PM CST Sunday, December 1.

FREE SHIPPING 
through Monday, December 2!! 
 Any order, any size!   
Enter code FREESHIP-ALL 
at check out (all caps, no spaces).

Hi Classy friends, it's Holly posting today.  I created this Christmas card with a masculine influence so I can send this to one of the men in my family.


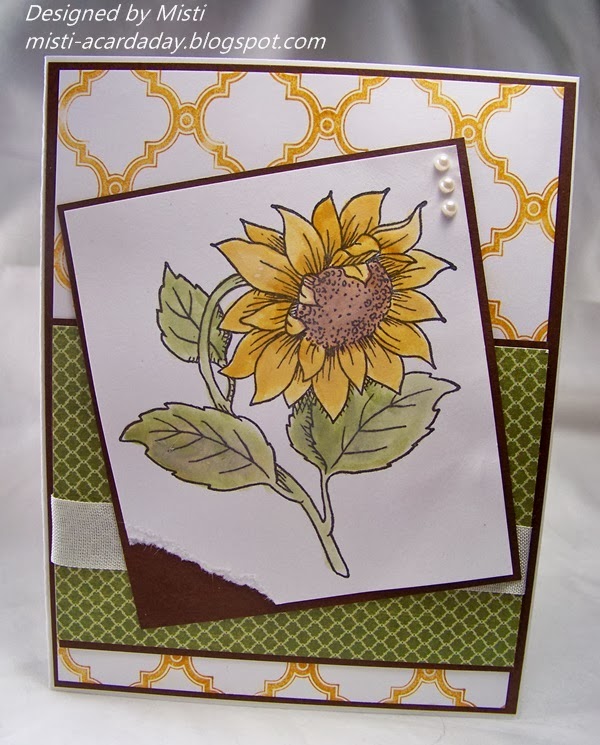
I started with a brown card base and I cut a layer from vanilla cardstock.  I sponged the edges of the vanilla paper first with some brown ink and then I adhered this to my card base.  Next was a smaller layer of brown cardstock and I cut some Kraft cardstock slightly smaller.  The Kraft cardstock was sponged with brown ink and then adhered to the brown cardstock layer.

I cut my snowflakes using various dies.  I used the  Snowflake Edger (Cheery Lynn Designs) for the tiny little snowflakes. Look at the edger die and see where the tiny little snowflakes are cut out from the border?  I saved those little snowflakes and set the edger die cut aside for another use.  I also used the Snowflowers Set 1 and  Snowflowers Set 2 (Cheery Lynn Designs) for the three larger snowflakes.  The Quickie Glue Pen is perfect for adhering these tiny and intricate snowflakes.  

With the snowflakes in place, I cut a small strip of vanilla cardstock and sponged the edges.  Then I used the Merry Christmas (Cheery Lynn Designs) to cut out my sentiment.  I used the smaller set and the Quickie Glue Pen to carefully adhere this to my vanilla strip.  Then this sentiment strip was adhered to my card with Joy! Foam Pads.


Great look for a masculine card! Thanks Holly!

Click any of the gold links above for more info or to purchase any of the products used.

Thanks for stopping by!!! Until next time...


Pin It

Friday, November 29, 2013

SALE!!!! Christmas Bell card

Small Business Saturday is another great day for sales!   
Enter coupon code 
DIES17
 at checkout for 

17% off wonderful die cuts from these companies!

 Sale begins at midnight CST tonight!  
This sale lasts from 
12AM CST on Saturday, November 29 
until 11:59PM CST Saturday, November 29.

FREE SHIPPING 
through Monday, December 2!! 
 Any order, any size!   
Enter code FREESHIP-ALL 
at check out (all caps, no spaces).

Hi!  Diane here with you today on the blog!

Do you have your Christmas cards done yet??  I am still working on mine. I made a simple, fast, but classy and pretty card to show you today.


Embossing on plain white card stock, I added an intricate bell from Cheery Lynn Designs Bow and Bell.  Not only do you get the bell die, but the bow as well.  Being the delicate die it is, I recommend using the Cuttlehug when running it through your die machine.

Now, I have to tell you about the bow.  You know the red velvet ribbon you see sold on rolls for your outside wreaths?  This is what my bow is cut from, giving a velvet texture to the card.  Don't you love the look of it?
I also added a sentiment from the Flourishes set Country Time Christmas.

I added a real jingle bell, but for easy mailing purposes you might want to add one of the Jolly Jingle Bells by Memory Box.

I hope you have enjoyed today's post and will be back again soon!


What a cute Christmas card! Thanks Diane!

Click any of the gold links above for more info or to purchase any of the products Diane used.

Thanks for stopping by!!! Until next time...

 
Pin It

Thursday, November 28, 2013

Black Friday Sale; Moroccan Lattice Sunflower

Black Friday is a day for great sales!   
Enter coupon code 
2013BlackFriday
 at checkout for 

23% off your entire order

 beginning at midnight CST tonight!  
This sale lasts from 
12AM CST on Friday, November 29 
until 11:59PM CST Friday, November 29.

FREE SHIPPING 
through Monday, December 2!! 
 Any order, any size!   
Enter code FREESHIP-ALL 
at check out (all caps, no spaces).

If you want to order more than one day during this special weekend, just make a note in the comments for me to hold it until after the sale.  We will start shipping orders that are to be held on Thursday, December 5th due to my schedule with my full time job.

Hi, it's Misti again!

I'm trying to sneak in a couple of flower cards before I start focusing mainly on Christmas and winter. Did you notice that there are some newly released JustRite stamps in the Classy Cards 'n Such store?


My card today features the sunflower from the newly released Sunflower Vintage Labels Five by JustRite. It stamps like a dream and it colors up so easily! I used Wild Honey, Vintage Photo and Peeled Paint Tim Holtz Distress Markers. I like the Tim Holtz Water Brush to get into the tiny areas of a stamp.

After my sunflower was colored, I decided to tear one edge of the paper to give it a little character.  I tore a little bit at a time until I got it the way I wanted. I know it's only a colored image, but I'd rather start out small than rip a big hunk out of it and have to re-color my image!

I took the Wild Honey distress marker and used it again, but this time I colored directly onto the Moroccan Lattice background stamp. The ink will dry before you get the whole area colored, but if you will bring the stamp close to your mouth and breathe heavy over it, also known as "huffing", you can re-moisten the ink long enough to stamp it on the white piece of cardstock.

I used the "Hot Fudge" paper from the Layering Swatches #2 - Deep Variety to back my pieces.

I added a piece of Seam Binding and three of the pretty Baby Pearls- White to finish it off.

You will be seeing more of this set from me!


Your card is so pretty! Thanks Misti!


Click any of the gold links above for more info or to purchase any of the products Misti used.

Thanks for stopping by!!!  Until next time...

    
Pin It

Weekend SALES begin NOW!!!

Happy Thanksgiving to all!!!

If standing in line and fighting crowds at the mall is not your thing, keep your eye on teh Classy Cards sales this weekend!

Through Sunday December 1, Classy Cards will have a different amazing sale each evening!  It will be a great time to grab gifts for your crafty friends and family, stocking stuffers and something for you too!!   To be sure you don’t miss any of these great deals, sign up for the Classy Cards newsletter today!   The signup form is on the Classy Cards blog on the left side just below the pink envelope.  

And FREE SHIPPING is on through Monday, December 2!!  Any order, any size!   Enter code FREESHIP-ALL at check out (all caps, no spaces).

If you want to order more than one day during this special weekend, just make a note in the comments for me to hold it until after the sale.  We will start shipping orders that are to be held on Thursday, December 5th due to my schedule with my full time job.

23% off 
through Thursday, November 28th!
Limited to quantities on hand

Enter coupon code
SB23
(all caps, no spaces)
at checkout
Labels Twenty-Nine


Select Cheery Lynn dies are now
 40% off!!!

Cheery Lynn Thanksgiving die cuts 
are now on clearance!
You can see them all in the Clearance section!
Some quantities are very limited

Cinderella's Pumpkins


Thanks for stopping by!!!  Until next time...


Pin It

Tuesday, November 26, 2013

Cranberry Acorn Swirls

Watch for the Classy Cards 
Thanksgiving, Black Friday, 
Small Business Saturday 
and Cyber Monday sales!!!


Hi folks, it's Holly posting today.  Today's card is all about the Autumn Swirls stamp by JustRite.


I love this gorgeous stamp. Sometimes I just want to show off the background stamp on my card and not cover it up with a bunch of other stuff.  Do you ever feel that way?  I am showcasing the glory of this beautiful stamp by accenting this with Glimmer Mist, some ribbon, and a sweet little sentiment.

I started with a dark brown card base. I inked up the
Autumn Swirls stamp by JustRite, with Versamark and pressed it onto some white cardstock.  I then covered the white cardstock with Clear Detail Embossing Powder, tapped off the excess powder, and melted the powder with a heat gun.  After that cooled, I sprayed Tattered Angels Cranberry Zing Glimmer Mist all over the embossed cardstock.  I let that soak in a little bit and then I wiped the Cranberry Zing Glimmer Mist off the embossed areas with a paper towel.

I set this piece aside to dry for several minutes and I stamped the "Dear Friend" sentiment from the Hugs and Kisses Sentiments set (JustRite), with dark brown ink onto a tiny strip of white cardstock.

When the Cranberry Zing Glimmer Mist piece was dry, I wrapped some ribbon around it and tied it into a bow.

I added some Joy! Foam Pads to the bottom of my sentiment and added it just below the ribbon.  I then glued the entire piece to my brown card base.

I love the gorgeous shimmer from the Cranberry Zing Glimmer Mist.  You can see it better in this picture below.


Your card is so pretty. Thanks Holly!

Click any of the gold links above for more info or to purchase the products Holly used.

Thanks for stopping by!!!  Until next time...

Pin It

Monday, November 25, 2013

Perfect Hostess Gifts

Hi, it's Joy today showing a quick project with products made from Classy Cards 'n Such supplies.

I can hardly believe that Christmas is just around the corner.  I wanted to make a couple gifts I could give as a little hostess gift when I attend those last minute "get togethers".


I used a couple of sheets of paper from the paper pad called Lady Rose 6.5" x 6.5" paper pad. The colors are so rich and deep with a sweet feminine touch.  This little gift was made in about 15-20 minutes.

The stamp set was from Impression Obsession's Thanks Sentiments.

A little button and some twine was added to each card and I  made colorful envelopes with the Envelope Punch Board (my favorite tool!).

The cards and envelopes were put into a recycled clear box and tied with a ribbon.

Recap:
Stamp Set    Thanks Sentiment
Paper          Lady Rose 6.5" x 6.5" paper pad
Tools          Envelope Punch Board 

Be sure to check out other wonderful paper pads at Classy Cards 'n Such to make some quick last minute gifts.

Have a HAPPY stamping day!


What a great gift idea! Thanks Joy!

Click any of the gold links above for more info or to purchase any of the products used.

Thanks for stopping by!!! Until next time...


  Pin It

Sunday, November 24, 2013

Snow Scenes Ornament

Hi!  It's Diane, with a little glittery fun!

One of my favorite color combinations for Christmas is silver and pink. However, those colors don't fit in my home, being a log home, at all.

I can pacify my love of it by creating cards in those colors. Which brings us to today's card!  I love a vintage look and when I saw the Flourishes Snow Scenes stamp set Beverly has in her shop, I knew it was for me!


I started my card with a plain white card stock, adding a piece of design paper I had on hand.  It was adhered with 1/2" Scor-Tape.  On top I layered a gorgeous doily cut from Cheery Lynn Designs Pinwheel Doily with Angel Wing (and this doily is on sale in the shop right now).


I cut an ornament from the Spellbinders 2011 Heirloom Ornaments. I stamped my cute little children building a snowman from the Flourishes set Snow Scenes with Versamark, then heat set with a Silver detail embossing powder.

Around the edge of the ornament, I added Art Institute Dries Clear Adhesive and sprinkled that with the gorgeous Tim Holtz Spun Sugar Distress Glitter!

I tied a real jingle bell to the bottom, but you could use the Memory Box Jolly Jingle Bells for mailing purposes.
To finish off my card, I added three snowflakes from
Cheery Lynn Designs Snowflowers Set 1 and Snowflowers Set 2 and covered with glitter.

I think it turned out beautifully. I hope you enjoyed today's post and will see you again soon!


A cute and fun card for the holiday! 

Click any of the gold links above for more info or to purchase the products used.

There are lots of new products in the Classy Cards 'n Such shop over the past week or so!   Be sure to check them all out here.

Thanks for stopping by!!! Until next time...


Pin It

Elegant Topiary and Cheery Lynn SALE!!!

Select Cheery Lynn dies are 

25%-40% off!!!  
Quantities are limited so hurry!! 

Find Cheery Lynn dies 
and other recently reduced items


Hi, it's Misti !

I've been seeing the chalkboard technique pop up everywhere.  That was my intention when I started this card, but when I picked out the designer paper, I decided it was a little more elegant. So I just went with the embossing on the black cardstock and didn't do any sponging around the edges.  


I chose the Holiday Topiaries by Flourishes that reminds me of "a partridge in a pear tree".  I inked up my stamp with white pigment ink and stamped it onto the Black Layering Swatch panel.

I sprinkled White Detail embossing powder over the ink and heat embossed it. The detailed powder doesn't hide the details of the intricate stamp.

The designer paper is from the Turtle Dove 6 1/2" x 6 1/2" Christmas paper pad by Kaiser Craft pad. I went with the piece that looks like a sheet of music... again with the theme "a partridge in a pear tree."  I added it to a layer of black cardstock and then layer it on the white card.

I added a piece of Red Satin String for a pop of color and it adds a touch of elegance.  

Are you singing "The 12 Days of Christmas" now, like I am???


Your card turned out beautiful! Thanks Misti!

Click any of the gold links above for more info or to purchase any of the products used.

Thanks for stopping by!!! Until next time...

 
Pin It