Showing posts with label D-Lites. Show all posts

Tuesday, February 17, 2015

Wishes For You

Happy Day all!!

Diane with you on the blog today showcasing my card for our latest challenge "Neutrals With A Frame".


I pulled out one of my stencils from Dreamweavers called Floral Heart.  There are several ways to use a stencil, but today I chose a very simple one, sponging on ink.  I used Tim Holtz Distress Inks Frayed Burlap and Old Paper, sponging first the light, then the darker ink on top here and there.

Being I love the shabby/distressed look, I distressed the edges of my card stock.

I cut Spellbinders D-Lites Cattails and adhered to the bottom left of the card. 

I cut a small frame from Spellbinders Decorative Labels Eightthen stamped with a sentiment from the new and beautiful JustRite Floral Basket stamp set.  Not only does this set have a gorgeous floral basket to stamp, but it has nine wonderful smaller sentiments, that fit perfectly on the small frames! The butterflies are from the same set as above.  I stamped them in a gold metallic ink and then fussy cut them out!

The finishing touches to my card were a few LeCreme pearls added to the stenciled heart floral.

We would love for you to join in our challenge with us this week!!

You're invited to Classy Cards 'n Such to see all the amazing products available.

We appreciate your sharing our cards and ideas on Facebook, Pinterest, Goggle+, Instagram...anywhere your crafty friends can be found. The icons below my signature make it easy to share.  

Thanks for stopping by!!!  Until next time...


Pin It

Friday, April 19, 2013

Grace


It's Jenn posting today.   I really love the different patterns and color combinations in the Laced with Grace Designer Paper Collection by Glitz Designs. Each pattern already has a pre-distressed look to it and since I love distressing anyway, that just makes me love the collection even more. Today I decided to work with the pale teals in the collection. One pattern in particular was jumping out at me (the zebra stripes) and that's how I came up with my teal and black color combination for the basis of this card. 


My card base measures 5.5" square. For my first layer, I distressed the edges of the solid teal pattern with the sheet music on it and then inked the distressed edges with Black Soot Distress Ink. Using the largest circle from Spellbinders Lacey Circles,I cut out a lacey circle from the teal zebra print pattern and adhered that in the center. Next, I cut out a 2.5" x 4.5" rectangle from the teal ledger pattern and matted it on black cardstock; placing it on top of the circle.

With the basics of my card done, it's time to get fancy! Using the Spellbinders D-Lites Fantastic Flourish One and black cardstock I cut out a flourish and placed it off-center to the left. I added a couple drops of Mint Green Liquid Pearls to the flower centers to make them stand out. Using Very Vanilla cardstock and Spellbinders Decorative Labels Eight, I cut out a label and stamped my sentiment. To finish things off, I added one Prima Calcutta Mini in Willow.  


Thanks, Jenn!!  I love the way you used the flourish!

Click any of the gold links above for more info on the products Jenn used.

Thanks for stopping by!!!  Until next time...


Pin It

Friday, March 8, 2013

Happy Spring

Hi Everyone. It's Jenn posting today. I don't know about you, but I'm ready for Spring and if I can't have it in my weather then I will create my own Spring in my cards.


I started out with a 4.25 x 5.5 base of Pearlized Esse White Metallic. To the left side, I added a strip of Trendy Tape in Polka Dot Green.

Using some textured green cardstock and the Spellbinders D-Lites Fantastic Flourish One, I cut out the beautiful flourish and made it the focal point of my card. I added some White Pearls in various sizes to the mini flower centers.

Using white cardstock and a Spellbinders Labels Eighteen, I cut out a label to stamp my sentiment on.

For the perfect finishing touch, I added a Prima Gillian flower in White to the upper left hand corner. These precious little puffs of sheer fabric just "scream spring" to me.

The sentiment on this card could easily be switched out to make a classy "happy birthday" or "thank you" card. So many possible options and very little time required. When time is of the essence, I recommend using Trendy Tape in place of ribbon and a Spellbinders D-Lites Shapeabilities as your focal point. You can't go wrong.


Thanks, Jenn!   Such a cute and pretty card!!

Have you seen all of the new Memory Box die cuts, Impression Obsession stamps and dies, Our Daily Bread Designs Easter stamps and Graphic 45 paper!  You can see all of these great products and more by clicking here!

Thanks for stopping by!!!  Until  next time...


Pin It

Monday, December 31, 2012

Doily Friendship

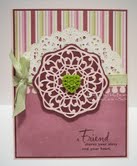
It's Holly posting again today, and I've got a sweet and feminine card to share with you.  I fell in love with the pretty Whimsy Hearts mini assortment, and I created this card as soon as I got these mini hearts in my mailbox.


You can get these resin hearts in the assortment package or you can get individual colors.  Look under the "Embellish" tab on the last page - you'll see all the Whimsy Hearts there.  (I confess, I also got the Whimsy Perfect Petals and I can't wait to put those on some cards!)

For my card today, I used the following products from Classy Cards 'n Such:

French Pastry Doily Die (Cheery Lynn Designs)
Cuties 3 die (Cheery Lynn Designs)
Dream stamp set (Stampavie)

I started out with a regular A2 card base in a pale pink cardstock and set that aside.  I cut a smaller layer of burgundy cardstock and adhered two strips of paper from the Love Letters 6x6 paper pad.  I die cut the French Pastry Doily Die from white cardstock, cut that in half, and adhered that to the striped paper.  Next, I die cut the Cuties 3 from pale pink paper and added that below the white doily.  (FYI - you don't have to make flowers from the Cuties dies - they make awesome borders as well!)

I stamped the sentiment at the bottom of the rose paper and I wrapped some pale green ribbon around the card layer between the doily and the Cuties 3 border.  Once my bow was secure, I glued this card layer to my pale pink card base.  

I used the two dies from the Medallion Five set to cut some burgundy cardstock and some pale pink cardstock.  I glued the pale pink medallion piece to the burgundy piece, and then I affixed the green resin Whimsy Heart to the center.  The medallion was adhered to my card with some Joy foam pads.  Isn't that little green heart a sweet addition to this dainty card?
Cute card, Holly!!

There are LOTS of great items to choose from in the Classy Cards shop where you can take advantage of our 20% off all orders, any amount, any items!   Enter coupon code 20%OFFALL (all caps, no spaces) at checkout.

Happy New Year to all!   Thanks for stopping by!!! Until next time...


Pin It

Saturday, November 17, 2012

Blue Christmas

Hi all. It's Jenn and I'm back with a Blue Christmas card. Every time I hear the words Blue Christmas, I'm reminded of my Dad and how much he loved that song..."I'll have a blue Christmas without you". Lord knows we have had many a Blue Christmas since he went home to be with the Lord. So Dad, this card is for you...
I started my card out with a Pearlized White Esse Metallic base measuring 4.25 x 5.5.  Next, using the Jewel Tones Assortment Craft Foil by Spellbinders and the Winter Wonders Spellbinders M-Bossabilities, I embossed the dark blue foil. Once embossed, I sanded it to reveal the silver that is underneath. I was a bit hesitant about sanding but, this stuff sands like a dream! Once I had it sanded the way I wanted it, I cut around the bow part of the embossing and cut it down to fit my card base. 

The embossing was so beautiful I wasn't sure what to add next. I could have stopped there and had a fabulous and elegant card. However, I decided to add some snowflowers. Using the beautiful silver paper that comes in the Foil Paper Textured Patterns 1 and the Cheery Lynn Designs Snowflowers Set 1, I die cut three snowflowers and added blue rhinestones to the center for finishing touches.

I love everything I used on my card today but, I'm totally in love with the craft foil by Spellbinders. I hope you'll give it a try!

 Jenn's card was inspired by Latisha Yoast's beautiful card on page 46 of the November 2012 issue of CardMaker magazine.  Isn't it beautiful???

I need to make room for all of the new products that have recently arrived and new arrivals yet to come, so I've put all Webster's Pages paper along with all Tim Holtz Ink Pads and Re-inkers on clearance!  Great prices and once they are gone, they are gone!  


All of the Spellbinders Dies D-Lites are now in stock and all pre-orders have been shipped.   These little dies are the cutest!!  Get yours now!!!
Medallion One

Click any of the gold links above for more info or to purchase.

Thanks for stopping by!!!  Until next time...


Pin It