Monday, December 31, 2012

Doily Friendship

It's Holly posting again today, and I've got a sweet and feminine card to share with you.  I fell in love with the pretty Whimsy Hearts mini assortment, and I created this card as soon as I got these mini hearts in my mailbox.


You can get these resin hearts in the assortment package or you can get individual colors.  Look under the "Embellish" tab on the last page - you'll see all the Whimsy Hearts there.  (I confess, I also got the Whimsy Perfect Petals and I can't wait to put those on some cards!)

For my card today, I used the following products from Classy Cards 'n Such:

French Pastry Doily Die (Cheery Lynn Designs)
Cuties 3 die (Cheery Lynn Designs)
Dream stamp set (Stampavie)

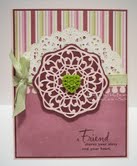
I started out with a regular A2 card base in a pale pink cardstock and set that aside.  I cut a smaller layer of burgundy cardstock and adhered two strips of paper from the Love Letters 6x6 paper pad.  I die cut the French Pastry Doily Die from white cardstock, cut that in half, and adhered that to the striped paper.  Next, I die cut the Cuties 3 from pale pink paper and added that below the white doily.  (FYI - you don't have to make flowers from the Cuties dies - they make awesome borders as well!)

I stamped the sentiment at the bottom of the rose paper and I wrapped some pale green ribbon around the card layer between the doily and the Cuties 3 border.  Once my bow was secure, I glued this card layer to my pale pink card base.  

I used the two dies from the Medallion Five set to cut some burgundy cardstock and some pale pink cardstock.  I glued the pale pink medallion piece to the burgundy piece, and then I affixed the green resin Whimsy Heart to the center.  The medallion was adhered to my card with some Joy foam pads.  Isn't that little green heart a sweet addition to this dainty card?
Cute card, Holly!!

There are LOTS of great items to choose from in the Classy Cards shop where you can take advantage of our 20% off all orders, any amount, any items!   Enter coupon code 20%OFFALL (all caps, no spaces) at checkout.

Happy New Year to all!   Thanks for stopping by!!! Until next time...


Pin It

Thursday, December 27, 2012

A Rose for You

Good morning, Steph here with an adorable stamp from Stampavie. It's called A Rose For You and would be perfect for any occasion from Valentine's Day to Mother's Day to birthdays.

I created a 5 1/2" x 5 1/2" card and added a sheet of paper from Glitz' Pretty In Pink paper pad. I inked the edges with brown ink. Another sheet of paper from this same collection was die cut with Spellbinders Labels Eighteen, in two sizes, the smallest of which was also inked with brown ink. This die makes for a great backdrop for the stamp.


The image was colored with Copic Markers and added to the frame with Joy Foam Adhesives.


The sentiment is from JustRite Stampers Spring Words set which is perfect for all your crafting needs.

I love this little puppy!  Thanks Steph!!

Be sure to take advantage of our inventory sale through January 3rd.  20% off everything!  Details are here!

Thanks for stopping by!!!  Until next time...


Pin It

Lacy Heart Smile Card


Hi, it's Holly posting today.  I hope you all had a wonderful Christmas!  I was in the mood to make a fun and cute card today, and I just pulled out some things and played around.  This is what I came up with.


I started with a kraft card base, 11" x 4.25", and folded the 11" in half to make a regular A2 sized card, 5.5" x 4.25".  I stamped the fun sentiment from Anytime Sentiments (Impression Obsession) near the top of the card with some black ink.  Next, I cut out a white doily from the French Pastry Doily Die (Cheery Lynn Designs) and then cut it in half.  I adhered one half of the doily to the middle of my card.

I pulled out the Doodlebug Sweet Cakes 6x6 paper pad and found a sweet pink gridded paper, cut out a lacy border from the Anastasia border die (Cheery Lynn Designs), and adhered that to the top of the white doily.  With the Sweet Cakes papers already out on my table, I picked five different patterns and die cut Classic Scallop Hearts (Spellbinders) from each of them, and then glued them down on the card in a random fashion.  The last thing I did was wrap some Doodle Twine Sweet Cakes Valentine Assortment bakers twine around the card between the sentiment and the pink border. 

This card can be a Valentine's card, an anniversary card, a general "I Love You" card, or a "Just Because" type of card.  The whimsical font of the sentiment is what inspired me to make this fun and colorful card.  I hope you are inspired to create something fun this week!  :-)
Thanks, Holly!  Cute card!!

It's almost time for inventory and I don't really like to count.  Enter coupon code 20%OFFALL (all caps, no spaces) at checkout for 20% off all orders - no minimum, any combination of  products!  This kind of sale won't come along again anytime soon, so take advantage now!  Limited to items in stock.  This deal expires Thursday, January 3rd.   

Thanks for stopping by!!!  Until next time...


Pin It

Monday, December 24, 2012

Merry Christmas!!!

Hi everyone!  

I started my card with a white card base and then cut a mat  using Labels Twenty-five from Stardream Lapis Pearlized Metallic - a gorgeous, shimmery navy!  The buck from the Deer Trio by Memory Box was cut from plain white cardstock.  I cut a small piece to form the hill, again using plain white cardstock and Labels Twenty-five.   I covered the hill with Art Institute Dries Clear Adhesive and added Crystal Ice glitter for the snow.

I used Joy! Foam Pads, both large and small, to mount the deer and give a bit of dimension.   The small foam pads are wonderful to use in small places like the deer's legs.

I used the A2 Matting Basics A from Spellbinders to cut the white mat and the navy mat and then outlined the card using silver lines.

I made this card for a birthday card, but it could easily be used for other occasions.
Merry Christmas to all!!!

Thanks for stopping by!!!  Until next time...


Pin It

Friday, December 21, 2012

Grow Old with Me


Good morning, Steph here with an anniversary card using assorted papers from the wonderful Handmade Holidays paper pack from Simple Stories.  I love the variety of papers and colors in this collection and it's great being able to use some of these papers for non-Christmas projects.


I selected several different sheets of paper from this collection pack to use on my card, inking each layer with Ranger Antique Linen Distress Ink,  and then matting each layer with brown cardstock.  I stamped Jack and Ginger on Cryogen White cardstock, then colored them with Copic markers.  Using the Spellbinders Oval Medallion Dies as an anchor for the couple, I cut the stamped image out and used Joy Foam Adhesives to pop the couple from the background layers.


Using Art Impression's Grow Old With Me stamp, I inked it using the Ranger  Black Soot Distress Marker and stamped it on another strip of paper from the Handmade Holidays paper pack.

I love this little couple!   This card would be perfect for a Valentine card, anniversary or even just because!

Even better...all Stampavie, including Jack and Ginger, are on sale!  Click here to find out how to save 15% on all Stampavie stamps!

Thanks for stopping by!!!  Until next time...


Pin It

Wednesday, December 19, 2012

Beautiful Poinsettias

Hi friends, it's Holly posting today!  How about another Christmas card to share with you?  I love making Christmas cards.  The two types of cards I make the most are Christmas cards and birthday cards.


This time I've used the gorgeous Poinsettias stamp (Stampavie) and I colored it with Copic markers.  I went back over the centers of the flowers with a glittery Stardust Pen to give them a glittery gold color.  You can see the wonderful gold shimmer in the close up picture below.  The sentiment, from the Christmas Sentiments stamp set (Impression Obsession), was stamped directly below the poinsettias.  

I really wanted the wonderful poinsettias to be the focus of my card, so I kept my card base and background very simple.  I covered my black card base (A2 size) with a sheet of paper from the Handmade Holiday 6x6 paper pad.  I cut out a border from the Anastasia border die (Cheery Lynn Designs) from black cardstock and added that to the right side of my card.  A strip of red plaid paper from the same Handmade Holiday papers was added next to the border die cut, and then I adhered my poinsettia image.  


I hope you have a wonderful and happy day celebrating Christmas with your families.  
I love the poinsettias, don't you?  Thanks, Holly!

Click any of the gold links above for more information on the products Holly used.

Thanks for stopping by!!!  Until next time...


Pin It

Tuesday, December 18, 2012

Candy Cane Train

It's Holly posting today, and I'm sharing this adorable Candy Cane Train with you.  I used the following items from Classy Cards 'n Such on this card:

Holly Leaves die (Cheery Lynn Designs)
Lace Corner Deco J die (Cheery Lynn Designs)


I started by stamping the Candy Cane Train on white cardstock and I colored it with Copic markers.  I sponged a little bit of Antique Linen distress ink on the bottom to "ground" the train.  Look at the wheels - see the Gunmetal Pearls in the centers?  Isn't that cute?

My card base is black cardstock and I added a layer of red plaid paper from the Handmade Holiday paper pad.  A smaller strip of multicolored plaid paper from the same paper pad was added to the left side and then I tied some seam binding around the lower part of the card.  The black lattice corner was die cut from the Lace Corner Deco J set and added to the top right corner.

The Candy Cane Train was matted with a black cardstock layer and then glued down onto the card.  The last thing I did was die cut a couple of holly leaves and glued them to the top right corner with a bright red button in the center.

I colored this train to coordinate with the colors in the papers I was using.  Think about all the fun possibilities that you could do with this adorable stamp.  What about a pink train?  Or perhaps a white/blue/silver combo?  You could go with traditional bright red and green or go crazy with pink and purple!  
Love this little train!  So cute!

My thoughts and prayers are with all of the families and friends of the victims of the horrible tragedy in Connecticut!  I hope yours are too!!!  I cannot imagine how difficult the past few days have been and the coming weeks, months, and years will be for them.

Thanks for stopping by!!!  Until next time...


Pin It

Sunday, December 16, 2012

Manger Scene


Hello everyone!  It's Linda posting my last Christmas card of this holiday season.  This is a very simple and easy card to put together and would be great if you're making multiple cards to send.  


I started by cutting a mat of Esse Smooth Pearlized Cocoa and then added a blue mat cut from paper from my stash.  The mats were adhered with Scor-Tape.   I used outline stickers to construct the front of the card.  The main focal  point is the Manger Scene.  The sentiment is from the Merry Christmas sentiment stickers.  I then outlined it with Gold Lines Border stickers.  I used the Bow-Easy to make my little bow and added a Want2Scrap rhinestone to make the star shine.


I want to thank all of you for following the Classy Cards 'n Such Blog and all of our design team members and for all  the kind comments you have posted about our cards.  I wish all of you a very Merry Christmas and may the New Year bring you much peace and happiness!
I hope you will try the outline stickers!  They are so quick and easy and very elegant, too!  Click any of the gold links for more information.

Thanks for stopping by!!! Until next time...


Pin It

Friday, December 14, 2012

Cardinal Greetings


Hi, it's Holly posting today and I've got this cute cardinal holiday card to share with y'all.  Have you seen the newest Christmas stamps from Stampavie in the Classy Cards 'n Such store?  These are adorable!  I bought up a bunch of these stamps, and I'm having a blast coloring them.  


My card starts with a black card base (A2 size) and I added a layer of paper from the Handmade Holiday 6x6 paper pad.  I die cut one of the corners from the Lace Corner Deco J die set (Cheery Lynn Designs) from black cardstock and adhered this to the upper left corner of my card.  The Cardinal on Pine Branch stamp (Stampavie) was stamped with black ink, colored with Copic markers, matted with a red layer, and then adhered to the card. 

I used the Sentiment Frame #2 die set (Cheery Lynn Designs) to cut the black label and the coordinating white oval for the sentiment at the bottom right of my card.  The sentiment, from the Noel Christmas Ornaments stamp set (JustRite), was stamped with black ink onto the white die cut oval and then I adhered it to the black label and affixed it to my card.

This card is going to be perfect to send in the mail with just one stamp.  It's flat with no bulky embellishments and it will be easy to make 5 or 6 of these in one sitting.  Have you been working on your Christmas cards?  :-)
Thanks, Holly!   I love cardinals and this one is no exception!  Get yours while supplies last!!

I have very exciting news today!  If you are in the Houston, TX area or you are up for a road trip, Stamp and Scrap Fest is coming to the Pasadena Convention Center January 19-20 with a Make and Take session on Friday evening, January 18th!   You can get more info and purchase your tickets right here on the Classy Cards 'n Such blog.  Be sure to enter Classy Cards 'n Such in the Referred by box.   Just click the Stamp and Scrap Fest icon on the right side of the blog.  See you there!!

Thanks for stopping by!!!  Until next time...


Pin It

Tuesday, December 11, 2012

Christmas Holly Flourish card

Hi Classy Friends!  It's Holly posting today.  How are you coming along with your Christmas cards?  I haven't mailed mine out yet, but it's getting down to the wire where I should start addressing my envelopes.  Here's another card to share with you before I send it out to a dear friend.

For this card, I have used the following items from Classy Cards 'n Such:

French Pastry Doily die (Cheery Lynn Designs)
Lace Corner Deco F die (Cheery Lynn Designs)
Holly Lace Flourish die (Cheery Lynn Designs)
Christmas Sentiments stamp set (Impression Obsession) - stamped on the inside of my card


I built this card from the bottom up, so let me take you through the process.  I started with a vanilla card base (8.5" x 5.5", folded in half), and then I added a sheet of paper from the Handmade Holiday paper pad.  I die cut the French Doily from burgundy cardstock and added that to the left side of my card.  Then I die cut the Lace Corner from the same burgundy cardstock and added that to the bottom right of my card.

A tan colored strip of paper from the same Handmade Holiday pad was added over the doily at a slight diagonal.  The Holly Flourish was die cut from vanilla cardstock and I snipped the various branches and flourishes so I could rearrange them to fit around my sentiment.  The sentiment is a piece that I cut from one of the papers in the Handmade Holiday pad.  A white pearl was affixed to the lace corner die cut and some seam binding was tied around the card on the left side.  The inside of my card is stamped with one of the Christmas Sentiments stamps in a burgundy ink.


It was a lot of fun to build this card from the ground up by layering and adding various papers and die cuts.  This is a great way to use non-holiday dies on a holiday card like I did here with the doily and the lace corner piece.  :-)
Thanks, Holly!

Have you checked out the Clearance section of the Classy Cards shop lately?   Lots of great deals to be had!!

Click any of the gold links above for more info.

Thanks for stopping by!!!  Until next time...


Pin It

Sunday, December 9, 2012

Noel Christmas card

Hi, it's Holly here with another Christmas card to share with y'all today.  All of the dies and the pearls on this card are from Classy Cards 'n Such:

Baby Pearls - White (Want2Scrap)

Noel Christmas card

My card is larger than the normal A2-sized cards I've been making.  This is a 5x7 inch card and it works beautifully to give me the extra room I need for the corner dies at the top and the sentiment at the bottom.  I started by adhering some paper to the upper part of the card base, some celery cardstock to the lower part and then adding a strip of white cardstock where the two background papers meet.  I die cut the French Lily Corner from white cardstock two times and adhered the die cuts to the two upper corners of my card.

The Grand Gothic Window and the Intersecting Arch dies were cut with white cardstock and adhered together.  I used the gorgeous Stained Glass Stickles technique from Technique Junkies to add some glittery white and blue window panes to my Gothic Window.  Once it was dry, I adhered the window to my card and added some White Baby Pearls to the window and to the French Lily Corners.  The last thing I did was cut some letters from the Parker Lower Alphabet die to spell out "noel" and affixed them below the window.

I confess, it's going to be hard to give this card away.  I love the way this one turned out.  The glitter, the pearls, the die cuts, the colors...... ahhhhhhhhhh.  Maybe this one should stay on my mantel for a little while???  :-)
Beautiful!

All glitter and embossing powders are on sale this week!   Click here for all of the details.

Thanks for stopping by!!!  Until next time...


Pin It

Saturday, December 8, 2012

Wreath with Birdhouse

Good morning! Steph here with an awesome stamp from Stampavie appropriately named  Wreath with Birdhouse.   It was the perfect element to accent this lamp post that I have had for ages!!!!  Due to the size of the lamp post, I created a 3 1/2" x 9" card.


I stamped the image on Cryogen White Cardstock, and then colored it with an assortment of Tim Holtz Distress Markers.


Using Joy Foam Adhesives behind the wreath, I applied it on top of the lamp post for dimension. With the wide variety of papers available in the Simple Stories Handmade Holidays paper pack, I was able to find the perfect sentiment to cut out and use on this card. 
I love the wreath and birdhouse!

Do you want great deals on your Classy Cards purchases?   Newsletter subscribers get the best ones!   Sign up on the upper left side of this blog beneath the pink envelope and start saving!

Thanks for stopping by!!!  Until next time...


Pin It

Thursday, December 6, 2012

Poinsettia Christmas card


Hello everyone!  It's Linda posting today.  It's been awhile, but I'm back with a very clean and simple Christmas card that takes very little time to put together.   I used some glitter paper I had in my stash and cut it with the Spellbinders Layered Poinsettia die.  I used the Emerald cardstock to cut the Poinsettia leaves and also added some of the Cheery Lynn Pine Branches under the flower.  I used the McGill Paper Blossoms Tool Kit and Mat to add some veins and dimension to the Poinsettia leaves.  I then layered the flower together and used the Gold Viva Décor Pen to make the center of the flower.  The white mat was cut from White Pearl Linen Cardstock and adhered to the red mat with Scor-Tape


The greeting is the Art Impressions Merry Christmas Stamp.  I stamped it with VersaMark ink and then embossed it with Sparkle & Sprinkle Firecracker Embossing Powder.  That's all there is to it, and you have a card that anyone would like to receive for Christmas!
Gorgeous, Linda!!

Embossing powder and glitter are 15% off through December 13th!   Details are here.

Thanks for stopping by!!!  Until next time...


Pin It