Showing posts with label Impression Obsession. Show all posts

Friday, February 26, 2016

Thanks a Bunch

This is the last card posting for my time on the Classy Cards 'n Such Design Team. Mindy here, and I thought a Thank You card would be appropriate for my final card.


I started by stamping the Coneflowers from Impression Obsession on a piece of watercolor paper and coloring with watercolor markers.  When it was dry, I ran it through my embossing machine with the Daisy Flourish Embossing Folder from Crafts Too!  I layered it on my card front, and then die cut the sentiment, Thanks by Elizabeth Crafts Designs along with a layer of thin craft foam to give the card some dimension.

I have really enjoyed my time with Beverly and the design team, working with the products she carried in the Classy Cards 'n Such Online Store.  The store is closing on Monday, February 29th, so click on the link to see the wonderful sale prices available on the remaining product.  Thank you for your comments and support during our many challenges.

Only four more days until Classy Cards closes, so take advantage of the wonderful sale going on!

Thanks for stopping by!!!  Until next time...


Pin It

Wednesday, February 17, 2016

Puppies Galore

There is nothing cuter than a load of puppies. Hi friends, Mindy here to share with you my sample card for this week's challenge #124 Colors, Stitching, and Pattern.  The inspiration photo for this challenge is so cute, I was inspired to use the colors and pattern of the puppies to create my own passel of pups.


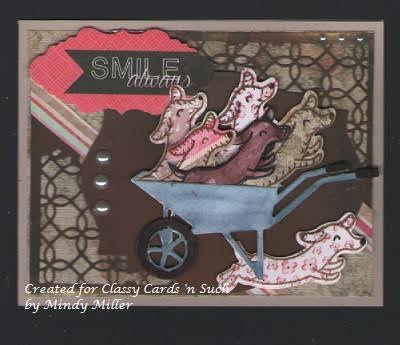
I decided to try and use up some leftover paper scraps I had on my work desk for this card. I started by cutting two of the Distressed Addington Collage Dies by Memory Box and anchoring them to opposite corners of my card.  From the same paper, I cut a label die from the Labels Eighteen Dies by Spellbinders and adhered it to the card front.  From watercolor paper, I die cut the Wheelbarrow by Impression Obsession and used watercolor markers to color it. While it was drying, I used a weenie dog die, to cut lots of pups from various papers inspired by the color photo.  I then inserted them into the wheelbarrow and adhered it to the label die.
To complete this card, I added a pre-printed sentiment label from the Say Aloha paper pad by Kaisercraft and a few decorative pearls. I hope you can join us for this challenge, there are so many possibilities for inspiration in the wonderful photo.


Thanks for stopping by!!!   Until next time...


Pin It

Thursday, February 11, 2016

Poppy Fence

Greetings, friends. Mindy with you today to share a card I really love. I have always loved poppy flowers, and when I saw this framed Poppy by Stacy Stamps, I knew I had to purchase it.


To start my card, I stamped the design on watercolor paper and colored and shaded the design with watercolor markers.  While it was drying, I embossed a rectangle of metallic bronze card stock with the Daisy and Swirl Embossing Folder by Crafts Too! for the background. I then adhered a doily die before adhering the framed poppy picture on top, raised up with foam adhesive to give dimension.

To complete my card, I stamped a sentiment from the Hope and Love Vintage Labels Eight and Nine by JustRite Stamps, a Medium Butterfly by Impression Obsession and a few sequins cut from the Sequins Die-Namics die from My Favorite Things.

Enjoy your week, and be sure to join us for our weekly card challenge on our blog.
Thanks for stopping by!!!  Until next time...


Pin It

Wednesday, February 10, 2016

Blossoms Birthday

Our challenge this week at Classy Cards 'n Such is Lilacs and Lace.  Mindy here, with my interpretation of th e inspirational photos from our blog.  I die cut a few tiny flowers and formed them into what I think a lilac blossom would look like, I have never seen one in person.  They don't grow well here where I live in Texas. 


I found an intricate lace doily that I had die cut previously, and adhered it to a background paper that fit my card base.  Then using the Hummingbird by Stacy Stamps, I stamped the bird and flower bunch on some watercolor paper and colored in with watercolor markers. While the watercolor was drying, I die cut two passes of the Tiny Flowers die cut by Impression Obsession and cupped them on my Paper Blossoms Craft Molding Mat available in the Classy Cards Online Store.  I hand-cut three shapes that look like a cluster of lilac, and then used my Art Institute Dries Clear Adhesive to adhere each flower. While the clusters were drying, I die cut around my stamping with a Labels Eighteen by Spellbinders then attached the three lilac blossoms.

Some lace, pearls, and rhinestones were added for bling, and the sentiment from Hope and Love Vintage Labels Eight and Nine from JustRite Stamps were added to complete the card.  I hope you have enjoyed my card, and will visit with us again for more card inspiration.


Thanks for stopping by!!!   Until next time...


Pin It

Thursday, February 4, 2016

February Birthday

Good afternoon, and welcome to another sample card from Classy Cards 'n Such. Mindy with you to share a birthday card suitable for a February Birthday. I hope you will enjoy it, and leave me a note. I enjoy comments from everyone.


My card background started with a sheet of watercolor paper that I lightly misted with water then embossed with the Smitten Embossing Folder by Anna Griffin. I then misted it again so it was wet all over, and tapped some of the Alizarin Crimson Color Burst and Merlot Color Burst from Ken Oliver Crafts.  When the card was dry, I accented the hearts on it with the Pearl Pen - Glitter Pink by Viva Decor and let it dry before adhering it to my card front.

I then die cut the amazing calligraphy die, Happy Birthday by Elizabeth Crafts Designs along with a thin sheet of craft foam to give the die stability and strength before adhering it to the card front. A fabric bow and small hearts, along with a butterfly die cut from Medium Butterflies by Impression Obsession were added to complete the card.

You still have time to join our weekly challenge over at the Classy Cards 'n Such blog.  I hope you will join our fun!

Want to purchase some or all of the products used in today's card?   Classy Cards carries those that are in gold and underlined.   Click those or the pictures below.  Happy shopping!!

Thanks for stopping by!!!   Until next time...


Pin It

Thursday, January 14, 2016

Birthday Wishes

Love and Best Wishes to you in this New Year! Mindy with you today, sharing a bright and cheerful card for that special birthday celebration.


I started my card by die cutting the medium balloon from the Balloons die cut set by Impression Obsession from thin craft foam, then adhering it to my clear stamping block.  I then inked it up, just like a rubber stamp, with a pale grey ink and stamped it on some white card stock. I then colored each one with my Copic markers and shaded each one with a darker color.  I then stamped the Flower Gift Boxes, also from Impression Obsession, and fussy cut the top box with bow to add beneath the balloon bouquet.

The background paper used on the card base, and Happy Birthday sentiment were both from the Say Aloha paper pad from Kaisercraft.   This card with the bright and cheerful colors of the balloons, could also be used as an entry in our weekly challenge on the Classy Cards 'n Such blog.  Our theme this week is making a card with Bright and Cheerful colors. Hope to see your entry soon.
Want to purchase some or all of the products used in today's card?   Classy Cards carries those that are in gold and underlined.   Click those or the pictures below.  Happy shopping!!

Thanks for stopping by!!!  Until next time...


Pin It

Tuesday, January 5, 2016

Hot Chocolate Time

Hi, it's Joy today - Brrrr.... it's cold today - no snow though.  Supplies to make this shaker card can be found in the Classy Cards 'n Such online store.  I just love going through the store and getting inspiration.  This is for the week's challenge called "Winter Blues".


The sweet little snowman is from Twinkles.  After coloring the snowman and bird, I covered them with Wink of Stella.  The sentiment was heat embossed on the acetate with Sparkle 'n Sprinkle's White Fine Detail Embossing powder.  To pop up the panel for the shaker, I cut some Large Joy Foam Pads and fit them around it.  The blue background paper is some  I made with Ken Oliver's Indigo Color Burst and the card base was embossed with Dots by Crafts Too!.

Now it's time to join all the others in the Winter Blues challenge. First, go to the Classy Cards 'n Such blog, get some inspiration from the Design Team members and make your project using blues - be sure to look at the details on the blog and then link your project here at the Classy Cards'n Such blog.  You could be the winner of a nice prize.

Thanks for looking at my card and have a Happy Stamping Day!

Want to purchase some or all of the products used in today's card?   Classy Cards carries those that are in gold and underlined.   Click those or the pictures below.  Happy shopping!!

Thanks for stopping by!!!  Until next time...


Pin It