Showing posts with label Trimcraft. Show all posts

Saturday, April 18, 2015

Baby Buggy

Hi, it's Jenny here with a baby card.  It seems like everyone around me is having baby girls lately.  


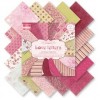
I kept this card simple because the background paper can really stand on it's own.  The background paper is from the Trimcraft Love Letters paper pad, and has a bit of shimmer that is difficult to see in the photo. I thought the alphabet design was perfect for a baby card.

The Baby Carriage is a Memory Box die and I the gingham paper is from my stash.  The beautiful oval doily is Spellbinders Oval Bliss die.  The oval was adhered to the background using Joy! Foam Adhesive Pads.

The little buttons are from my stash and were adhered with Scor-Tape. This stuff is incredible, it really holds on heavy embellishments amazingly well.

Thanks for visiting and don't forget to check out our weekly challenge for a chance to win a great prize!


Don't forget to check back tomorrow for our next challenge! We have an inspirational photo for you, for our CCNS #81 Cherry Blossoms / Dogwood challenge!

Thanks for stopping by!!! Unti next time...


Pin It

Saturday, February 28, 2015

Arianna Thanks

Hi, it's Jenny posting again, with a Clean and Simple style card. 

If you've seen my cards lately you know I have been using my Arianna Blooms flower die on almost everything, but I haven't used the delicate central part of the flower that is part of the die.


I thought it would be fun to create a negative space card with the centers of the Heartfelt Creations Arianna Blooms die. This part of the die reminded me of snowflakes and by changing the colors this could make a simple and elegant Christmas card.

I first positioned the three dies over a piece of white card stock and ran it through my big shot using the magnetic spacer platform so the dies would stay in place. I then took the white panel and layed it over different colors of designer paper to see which looked best underneath. I wanted a simple paper that wan't too pale because I wanted contrast with the white. I chose a paper from my Love Letters paper pad, and found the pink paper in the same stack to cut the 'Thanks' word from the Impression Obsession Greeting Set.

I used Joy Foam Pads to adhere the white card stock to the green paper to really show off that negative space. Then I layered and glued the three die cuts to form a flower.  I added Pink Rhinestones and used Joy Foam Pads to attach the flower to the center of the largest cut out.

To finish off, I added some Wink of Stella glitter to the 'Thanks' word. Then I glued the word and added rhinestones to the centers of the other two cut-outs.  Thanks for looking and I hope you can join our challenge this week!


Check out our Easter SALE here!!!   Enter coupon code EASTER14 and get 14% off these items while supplies last!   Some items are very limited in quantity and when they are gone, they are gone!

Thanks for stopping by!!! Until next time...


Pin It

Wednesday, January 14, 2015

Framed Flowers

Hi, it's Jenny posting today! For our challenge this week, it calls for the color Pink and Polka Dots. I didn't even think about the challenge until I realized the background paper has the circles that resemble polka dots. Perfect!

I was playing around with my new Cheery Lynn Designs Vases die and this is the result.


I began by cutting out the Impression Obsession Hollyhocks die and coloring the pieces with Copics.  I then used a Wink of Stella Glitter Pen to add a beautiful sheen to the flowers.

I put the flowers aside and cut a piece of design paper from the Love Letters paper pad. Some of the small background circles are also sparkly. I found two more sheets of paper I liked in the same paper pad. I used the green one to cut the vase from the Cheery Lynn Vase set, and used the largest frame from the Impression Obsession Rectangles 6 in 1 to cut the darker pink paper.

I popped the frame up with thin strips of pop dots and added dimensional adhesive behind the vase and some of the flowers as well.

The Hello word was cut from Kraft card stock using the Impression Obsession Greeting set. Last, I used some  LeCreme Baby Pearls to accent the vase.

Thanks for looking!


We appreciate your sharing our cards and ideas on Facebook, Pinterest, Goggle+, Instagram...anywhere your crafty friends can be found. The icons below my signature make it easy to share.

Thanks for stopping by!!! Until next time...


Pin It

Wednesday, September 17, 2014

Oh, Deer!

Hi, it's Jenny posting today.  I made this card for the newest Classy Cards 'n Such Santa's Reindeer challenge. 

This is a shaker card and was very simple to create.  I started with a 5.5"x5.5" square gray card and then cut each of the white and pink patterned paper layers a quarter of an inch smaller than the previous layer.


I cut the beautiful delicate frame from the PoppyStamps Claudette Frame die. I then glued the white die cut to the soft pink patterned paper, from the Trimcraft Love Letters paper pad, and then cut out the center using a Spellbinders Classic Squares Small die.

I cut another square out of white card stock using the same Spellbinders square die, and then embossed the square with the Anna Griffin Cherry Blossom embossing folder. The flower burst embossed pattern reminds me of snowflakes. I glued the white embossed square to the center of the large white layer so the embossing would show through the window.

I glued the gray Impression Obsession deer off-center to the embossed square, and then sprinkled loose clear iridescent snowflakes over him. The edges of the deer's antlers and feet were brushed with Tea Dye Distress Ink.

I glued a clear plastic square (left over from packaging) to the reverse of the Love Letters pink paper, then formed a square around the underside of the central opening with foam tape. I turned the panel right side up, and pressed down on the foam tape to get a nice seal around the interior shaker box.

Thanks for looking and I can't wait to see your reindeer creations!


This would be a great time to join in the challenge. Click on the Current Challenge label on the right side of the blog and check out the details. Challenge a friend to join you!

Classy Cards 'n Such online store has added new products. Click here to find all the new items that have been added!

Thanks for stopping by!!! Until next time...


Pin It

Tuesday, February 4, 2014

Raining Roses

Hi, it's Holly posting today!  This week's challenge on the Classy Cards 'n Such blog is Think Pink.  For my card, I went with a Valentine theme and lots of pink colors.


First of all, I stamped the adorable Wild Rose Studio Raining Roses, with Tuxedo Black Memento ink onto white cardstock, and then I colored the image with Copic markers. I cut it out with an oval die and then matted it with a matching scallop oval in a pale pink cardstock.

Next, I cut some paper from the Love Letters Premium 6 x 6 paper pad by Trimcraft and adhered it to a white card base.

I affixed the sweet little bears image with Joy! Foam Pads to the center of the card.

The Valentine sentiment, from Hugs and Kisses Sentiments (JustRite), was stamped on a small strip of white cardstock and then adhered below the bears.

Last, some Mother of Pearl Rhinestones were affixed to the corners.

I hope you play along in this Think Pink challenge!  Pull out all your pink cardstocks and markers and have fun!


What a cute card and so sweet! Thanks Holly!  The Raining Roses stamp that Holly used is actually this week's challenge prize!  Enter for an opportunity to win!!

Click any of the gold links above for more info or to purchase any of the products used.

Thanks for stopping by!!! Until next time...

 
Pin It

Friday, January 17, 2014

Velvet Glitter Card

Hi folks, it's Holly posting today!

Have you seen the new Velvet Glitters in the Classy Cards 'n Such store?  Oh my goodness, they are GORGEOUS!  I've used the Orchid Rose Velvet Microfine glitter on this card here.


I started by pulling some papers out of the Love Letters Premium 6 x 6 paper pad, just mixing and matching until they were just right.  I cut the papers and adhered them to a black cardstock layer.

For the bottom, I die cut one of the solid beige papers (from the same Love Letters pad), with the Lady Kate Edger (Cheery Lynn Designs), and adhered it below the pink paper.

I then stamped the sentiment from Hugs and Kisses Sentiments (JustRite) with black ink directly onto the pink paper.  

Now the fun started!  I adhered two strips of 1/4" wide Scor -Tape above and below the sentiment. After I removed the liner, I covered both strips of tape with the Orchid Rose Velvet Microfine glitter.  I used the glitter roll technique from Technique Junkies to make sure the glitter was well adhered and then I brushed off the excess.  The Orchid Rose Microfine glitter is a perfect match with the colors in this Love Letters paper pad.

Next, I cut the Vintage Apothecary Jar from vanilla cardstock and set it down. I then used a small heart punch from my stash and punched out several hearts from the Love Letters Premium 6 x 6 paper pad. I then adhered the hearts to the "inside" of the jar and then affixed the jar to the card with some Joy Foam Pads. I glued the entire card front down onto a vanilla card base.

This glitter is just awesome.  It's so fine and so soft, it really does feel like velvet!  I can't wait to try out the other colors!!!


Your card is so cute and pretty! Thanks Holly!

Click any of the gold links above for more info or to purchase any of the products Holly used.

Be sure to enter the Hearts and Doilies challenge!  There's still time as it doesn't close until Saturday.

Thanks for stopping by!!! Until next time...


Pin It

Tuesday, January 7, 2014

Banner with Borders

Hi folks, it's Holly posting today!

Did you see that Classy Cards 'n Such has a new challenge this week? Yup, we'll have a new challenge every week and I hope you'll play along with us.

This week, pull out your border dies to create something and share it with us.  We'd love to see what you've been doing with your border dies.


I used two border dies on my card.  Look just below the ribbon - see the green and the pink border dies?  I used those to mark a separation between the banners and the patterned paper at the top.

The patterned paper and banners were made using the  Love Letters Premium 6 x 6 Paper Pad (Trimcraft). This paper pad has more sheets than most 6" x 6" paper pads with 64 sheets - 4 each of 16 designs. Half of the sheets are double-sided and half are single-sided with glitter effects.

The following products were used on this card:

Anastasia Border (Cheery Lynn Designs) - pink border
Ankara Lace Border (Cheery Lynn Designs) - green border
Picking Wildflowers - sentiment from stamp set (Flourishes)
Joy! Foam Pads Large (behind the sentiment)

Check out the inspiration from my fellow Design Team members by clicking here. Play along with us and enter in the challenge. You could win a prize!


Your card is so beautiful! Thanks Holly!

Click any of the gold links above for more info or to purchase any of the products Holly used.

Thanks for stopping by!!!  Until next time...

 
Pin It