Showing posts with label We R Memory Keepers. Show all posts

Monday, February 8, 2016

Pretty Flowers

Hi, Diane with you today. This week's challenge is Lilacs and Lace.

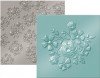
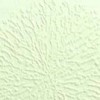
I started with a gorgeous new embossing folder from We R Memory Keep Next Level - Quilted.


Next, a lacy heart was die cut using two of the dies from Spellbinders Lace Hearts. 

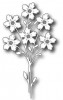
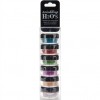
Flowers were cut using Memory Box Blushing Bouquet.  The flowers were painted with a Tim Holtz Water Brush and using colors from Twinkling H2Os Holiday Sparkle and 
Autumn Brillance.  It gives them a watercolor effect, but they are actually a bit shimmery from the H2Os.

To finish, I simply added a bow!  Thank you for visiting with me today!


Be sure to get in on this week's challenge!   All of the details are here.

Thanks for stopping by!!!  Until next time...


Pin It

Tuesday, February 2, 2016

Framed Heart

Hi, Diane with you today.  This week's challenge on the blog is Love Makes The World Go Around.  We were to use red and/or pink and hearts.  We also have a beautiful inspiration photo and you can find it by clicking on the current challenge tab.


I made a simple but gorgeous card.  I started by embossing with a new in store embossing folder by We R Memory Keepers Bouquet - Next Level These give a deep beautiful impression.

Next, I cut Impression Obsession Rectangles 6 in 1 Frames.
What this means is you get one die, but it cuts six frames all in one cut.  I used three of the six.

Each was popped up with Joy! Foam Pads Small. The frames  were cut from Pearlized Esse White Metallic card stock.

I cut a heart using Memory Box Precious HeartsThe heart was cut with red mirricard card stock.

I hope you enjoy my card and try one yourself!

Thank you for joining me today!

Be sure to check out all of the great items in the CCNS store that are on sale!  Details here.

Thanks for stopping by!!!   Until next time...


Pin It

Next Level Love

Hello! Diana here to share with you a card I made for this week's challenge to use Red, White, Pink, and Hearts. This card is a case from Jennifer McGuire's video on using the We R Memory Keepers Next Level embossing folders. 

 I used Distress colors Fired Brick and Picked Raspberry, We R Memory Keepers Bouquet embossing folder, Quietfire Design Love die, Perfect Pearls Biscotti, and Spellbinders A2 Matting Basics A. Per her instructions, I masked my area off, sponged the colors on generously and then buffed on the perfect pearls. I then ran it through my Big Shot with the embossing folder. The red and pink changed their hues a bit after I added the perfect pearls and they really do look metallic. To adhere the gorgeous Love die cut, I recommend using a glue like Art Institute glue since it has a nice fine tip.

I hope you enjoyed my card!


Thanks for stopping by!!!  Until next time...


Pin It

Friday, December 25, 2015

Merry Christmas

Hello, today it's Joy with a card made with supplies from the Classy Cards 'n Such online store.  This afternoon I was invited to a last minute party and needed a Christmas card - quick, quick quick!  I was almost in a panic - but then I remembered that I had some left over components from Blueprints 4.  I keep all my left over components in a zip lock bag which makes it easy to make a quick card.


I stamped the Merry Christmas from Christmas Joy by Sweet 'n Sassy and heat embossed with Sparkle 'n Sprinkle White Detail Embossing Powder then rounded the corners of the red card stock with the We R Memory Keepers Envelope Punch Board. The pretty paper is from Believe by Authentique.   I have to say because the components were already cut out, this was one of the fastest cards I've ever made -- and I even made it to the party on time.


Thanks for looking at my card.  Have a happy stamping day.


I hope everyone is having a wonderful Christmas Day!

Thanks for stopping by!!!  Until next time...


Pin It

Tuesday, November 10, 2015

Merry Christmas

Good morning friends!  Today our challenge at Classy Cards 'n Such, will be to make a project with stockings or mittens, using red and white, and a touch of green.


I die cut the Stocking Garland from PoppyStamps, but just used the stocking part. The papers are from the 6" x 6" pads called Mistletoe Collection by Bo Bunny, and Home Sweet Home from Graphic 45. The stockings were popped up with Joy! Small Foam Pads.

The Merry Christmas stamp by JustRite Stamps, is from the Noel Christmas Ornaments, and was heat embossed using White Detail embossing powder by Sparkle 'n Sprinkle.

These cards are just little hand out cards for friends, that measure 4.25" x 4.25".  So I made little envelopes to go with them with my We R Memory Keepers Envelope Punch Board.

How would you add a some stockings or mittens to your project?  Now, it's your turn to show us what you would do with Classy Card 'n Such #110  Mitten/Stocking challenge. We would love to see what you would do with this challenge. You could be the winner of a nice prize! 

Thanks for looking at my card - have a happy stamping day!


Join the Classy Cards newsletter and get the best deals on our products! It's easy...the sign-up form is on this blog in the black box on the left side. Get 20% off an order of your choice as a newsletter subscriber. What a deal!!

Thanks for stopping by!!! Until next time...


Pin It

Thursday, September 17, 2015

Monogrammed Box

Hello, Diana here to share with you, a gift box I made for a sweet lady at church.

I gathered up some cards I had made, and wanted to give them as as gift, so I made this box to put the cards in. However, I think the design would work just as well for a set of personalized note cards. Monogramming is always so lovely and elegant.


To make my box card, I used a 9" x 9" sheet of paper, and used the We are Memory Keepers Envelope Punch Board at 3.5" and 4.5". There are lots of videos out there so I won't go into details, but this (click here for video), is where I learned how to do my box.

To decorate the front of my box, I really layered up the dies: Spellbinders A2 Filigree Delight, Standard Ovals, and then a tag from Fancy Tags Two. All popped up with Large Foam Pads. The center letter 'E' was cut out using my dusty electronic cutting machine, and then I added a Memory Box die, Pennington Rose to the side.


Finally, lots and lots of pearls were made using the Ice White Viva Decor Pearl Pen. There is just a hint of an oval embossing line from the A2 Filigree Delight die, which really helped the placements of the liquid pearls. 

Instead of using the ribbon as suggested in the video, I added a Fastener Adhesive Tab by Tombow. It opens and closes so easily! The tabs are not in the store, but you can send an email to Beverly at beverly@classycardsnsuch.com, and ask her if she would be able to order the tabs. The same goes for other items you may be looking for. 

Thanks for looking!


Click any of the links below to be taken to the products from the Classy Cards 'n Such shop. Don't forget to check out the NEW section. It is loaded with new goodies! 

Thanks for stopping by!!! Until next time...


Pin It

Friday, September 4, 2015

Celebrate Every Day

Good morning, Joy here posting a card made with supplies from  the Classy Cards 'n Such online store.


First, was to emboss a piece of white card stock with an embossing folder called Juliet Damask, by Anna Griffin.

Then I added some designer paper from the 6x6 paper pack called Vintage Bliss by Simple Stories.

The "Celebrate" word was die cut, then Wink of Stella added and glossy accents on top of that for some extra shine.

The butterfly stamp is from Majestic Monarchs, and it was die cut using the Majestic Monarch die, both from Sweet 'n Sassy, and covered with Wink of Stella.

The corners were rounded using the corner rounder of the Envelope Punch Board.

I hope your day is one to celebrate - every day we should celebrate something!


Want to plan ahead and join our weekly challenges? Just click on the Challenge Calendar label, located on the right side of the page. We would love to have you share your creative ideas! Invite your friends to play along! You could be our next Classy Cards 'n Such prize winner!

Thanks for stopping by!!! Until next time... 


Pin It