Monday, November 28, 2011

Welcome to Classy Cards ‘n Such and Technique Junkie Newsletter Joint Blog Hop!

The Technique Junkie Newsletter is excited to showcase their new 3D and Fun Folds CD and Classy Cards 'n Such is thrilled to be part of this hop!

The Technique Junkie Newsletter has been publishing rubber stamping technique tutorials since 2002. The 3D and Fun Folds CD contains 70 step-by-step technique tutorials in PDF format – perfect dimensions, perfect directions and great pictures for every step. Visit http://www.techniquejunkies.com/ for more details about the CD and the Technique Junkie Newsletter.


A fantastic group of design team members from both Classy Cards ‘n Such and the Technique Junkie Newsletter have helped put together this fabulous Blog Hop to kick off the 3D and Fun Folds CD.
Technique Junkies has a Blog Hop happening each day this week with an opportunity for you to win many prizes from some of their wonderful advertising companies! Please stop through EVERY DAY starting at the Technique Junkies blog here and take your time visiting each blog!  You have until 11:59pm EST December 2nd  to leave comments on as many blogs as you can. 


On Saturday, December 3 Pat from Technique Junkie Newsletter will announce the winners from each company. Be sure to hop along on each day! There will be FIVE WINNERS! On Monday, December 5th, Pat will announce ONE LUCKY WINNER with a GRAND PRIZE with a bundle of prizes from all of the participating businesses.


In addition, if you leave a comment on this blog by 11:59pm EST December 2nd, I will pick a random winner for another $20 gift certificate for the Classy Cards 'n Such online shop!
If you have been following along already you should have come from Technique Junkie Blog and go from there.  You won't want to miss any stops along the way.  In order to win you will need to comment on everyone’s blog AND Pat Huntoon’s Blog.  There will be an additional chance to win by playing along in Pat's blog!


I created this delightful Pocket Gift Card Holder which is one of the projects on the 3D and Fun Folds CD.
I started with the beautiful Stardream Fuse Vista paper.  I love the metallic sheen it has!   The patterned paper is from the Waiting for Santa & Sweet Season paper pack.  I colored the jingle bells with Twinkling H20s and then finished the card by decorating the Christmas tree with Baby Red Rhinestones.   Easy-peasy!!   All of the instructions, measurements and more are on the 3D and Fun Folds CD.


Beverly
Pocket Gift Card Holder

Linda chose the Flap Fold card for her projects.  She made two beautiful cards - both completely different!   Take a look...

For the base of this Flap Card, I used Stardream Emerald cardstock from Classy Cards 'n Such.  The other papers used on the card came from my paper collection. 
I used Spellbinders Tear Drop Circles on top of the flap and added one of the smaller Spellbinders Standard Large Circles, also in the Stardream Emerald paper.  For the flower, I used the three smallest dies from the Spellbinders Layered Poinsettia and finished off the center with Want2Scrap Orange Rhinestones.  On the inside, I layered the DP paper and the Stardream Emerald cardstock and added a gold embossed "Merry Christmas" stamp from Artistic Impressions and embellished with a small poinsettia.


Linda
Flap Card


Linda's second Flap Card features beautiful butterflies!

For this Flap Card, I used Stardream Rose Quartz Cardstock as the card base.  I added a mat of the beautiful Butterfly Cardstock to the front.  On the flap, I used the Spellbinders Butterflies Circles die cut from the Butterfly Cardstock and added a circle of the Rose Quartz using the Spellbinders Standard Large Circles.  I topped this off with a small butterfly die cut from Cheery Lynn Designs.  The butterfly was embellished with pink pearls from Want2Scrap.  Since this card can be used for many occasions, I did not add a sentiment at this time but will choose an appropriate one before it is sent to the recipient.


Linda
Butterfly Flap Card


Your next stop on the hop is Holly Brown, but just in case there are any hiccups, here is the whole list of celebrants on this party train:
Classy Cards 'n Such Blog    You are here!

Thanks for playing along and best of luck!!!

I've extended the Black Friday sale to include Cyber Monday!  Use the promo code 2011BlackFriday (no spaces) at checkout today only to get 20% off your entire order!

Pin It

Sunday, November 27, 2011

The True Gift of Christmas

I have exciting news to announce today!   Tomorrow, Monday, November 28th, Classy Cards 'n Such is partnering with the Technique Junkies Newsletter in our first ever blog hop!  The hop is sponsored by the TJ newsletter and will go on through Friday with the newsletter partnering with a different company each day. You will be able to see lots of fun cards and other projects along the way from many talented designers.  The cards feature projects on the new Technique Junkies CD - 3D and Fun Folds.  There will be blog candy along the hop with a GRAND PRIZE awarded at the end of the hop.  To be eligible, you will need to comment so be prepared!   Full details on my blog post tomorrow morning!!!  The post will go live at 6:00AM Central time.

Today is the last day for our BLACK FRIDAY sale where you can get 20% off your entire order by using the promo code 2011BlackFriday (no spaces) at checkout.   Full details are in this post.   This sale will not return soon, so take full advantage of it today!  I just discovered an error in the end date for this code and IT IS NOW CORRECTED.   I apologize if you tried earlier this morning and it didn't work, but please try again!!

And now, here's a beautiful card from Jennipher.

Hello Everyone!

It's Jennipher and I'm back with a creation for Classy Cards 'n Such using the Webster's Pages Waiting for Santa Collection. I don't think that I could ever grow tired of this collection. It is just so versatile and is perfect for those Classy Christmas Cards!

I started with a card base of Cherry Cobbler cardstock. To that I added a layer of the gorgeous deep red text patterned paper from the Waiting for Santa collection. This patterned paper is double sided and the opposite side was perfect for creating the long rectangle accent layers.

Using my Lacey Ovals from Spellbinders, I cut out a small Very Vanilla oval to stamp my cross on in Cherry Cobbler ink. Once that dried, I stamped "Jesus" over the cross with Memento Tuxedo Black ink  I then used the larger Lacey Oval to cut out a Cherry Cobbler oval to layer the smaller one on. Once I mounted this onto the other layers, off to the side I stamped "the true gift of Christmas".

To the top and bottom layers I added Want2Scrap Red Rhinestones Baby Bling. My final and finishing touch is my favorite...the candy cane from Webster's Pages Silhouette Holiday Variety Pack. These are absolutely gorgeous and there is an entire package dedicated to the Christmas Season. The perfect addition to a Classy Christmas Card!


Jennipher
http://jennipherlowery.com

Thanks for joining me today!


Be sure to shop the last day of our Black Friday sale today and check in tomorrow for the blog hop!!!

Thanks for stopping by!!!  Until next time...

Pin It

Saturday, November 26, 2011

New products in the store!!!

There are LOTS of cool new items in the Classy Cards `n Such online shop!  Click the links below to see all of these great items!
  • Twinkling H2Os – There are currently four different packs of six different colors to choose from.  If you have never tried Twinkling H2Os, you really should.   They are sooo easy to use and have a bit of a sparkle to them!  Although I've heard of other methods, my favorite is to use them as a watercolor to color a stamped image or outline stickers.  So fun!!
  • Viva Décor Pearl Pens – Five great colors...Ice White, Cream, Yellow, Gold, Silver
  • GlazOn – Three styles – Clear, Matte, Vintage
  • Lifting Tool – This is a really neat tool to have at hand!  It's a double ended scoop which is great for picking up small embellishments like brads, beads, eyelets, or glitter.
  • Scallop Tag cards – Too cute!!  Something a little different.  10 cards, 5 colors, 10 envelopes.
  • Layering Swatches – This is a hand picked color combination of beautiful metallic swatches!  Perfect for mats or smaller die cuts.  Five each of Amethyst, Rose Quartz, Lapis, Bluebell, Pegasus.  From The Paper Cut.
  • New Stardream colors – Rose Quartz – beautiful light pink; Jupiter – a great red for Christmas or Valentine's; Punch – gorgeous purple!!
  • Cryogen White paper – a favorite for Copic users, but great for other projects as well
  • Butterflies – This is truly beautiful metallic paper embossed with tiny butterflies!  It would be beautiful for any project whether detailed or simple.
Black Friday sale continues through Sunday, November 27th!  Enter promo code 2011BlackFriday (no spaces) at checkout to receive 20% off your entire order!!!  Quantities are limited, so first come, first served.  Orders will be filled in the order in which they are received. No other discounts apply except FREE SHIPPING as described below.  Free shipping will be returned as store credit since only one promo code can be used per order. 

FREE SHIPPING
  • All Cheery Lynn and Scor-Pal products totaling $50 or more SHIP FREEThese orders must contain only free shipping items.  Domestic orders only. Full details at checkout.
  • All domestic orders of $75 or more SHIP FREE - any combination of products is allowed.  Enter promo code FREESHIP (no spaces) at checkout.
  • No other promo codes except 2011 Black Friday apply with FREE SHIPPING
Store credit is still available for qualifying purchases through December 31st. Full details here.

Join the Classy Cards 'n Such Yahoo group here for exclusive weekly discounts and an introductory 20% off an entire order of your choice!

SHOP NOW for the best selection!!!

More good things are in the making so keep watching!!   I'm hoping to be back with a new card post later this weekend.


Pin It

Tuesday, November 22, 2011

Black Friday starts NOW at Classy Cards 'n Such!!!


Black Friday starts NOW at Classy Cards 'n Such!!!  Enter promo code 2011BlackFriday (no spaces) at checkout to receive 20% off your entire order!!!  Quantities are limited, so first come, first served.   Orders will be filled in the order in which they are received.   No other discounts apply except FREE SHIPPING as described below.  Free shipping will be returned as store credit since only one promo code can be used per order.

FREE SHIPPING
All Cheery Lynn and Scor-Pal products totaling $50 or more SHIP FREE  These orders must contain only free shipping items.  Domestic orders only. Full details at checkout.
  • All domestic orders of $75 or more SHIP FREE - any combination of products is allowed.   Enter promo code FREESHIP (no spaces) at checkout.
  • No other promo codes except 2011 Black Friday apply with FREE SHIPPING

Between now and December 31st, every $50 in products purchased after all discounts and before postage is added in a single order will earn you $5.00 in store credit.   Here's how it works. 
· $0 - $49.99  - no store credit
· $50 - $99.99 - $5 store credit
· $100 - $149.99 - $10 store credit
· $150 – $199.99 - $15 store credit
· $200 - $249.99 - $20 store credit
· Etc
Order as often as you like and collect even more store credit!   You will receive an email with the store credit once your order is processed.

Classy Cards `n Such Gift Certificates are a wonderful solution for holiday gifts!  They can be ordered in any amount and make your holiday shopping a breeze!!  Gift certificates will be issued in the amount remaining after any discounts are applied.

Order your Classy Christmas Kits and Classy Christmas Embossing Bundles now!!!  Click the links for details.

Be sure to check out the new Clearance section for great bargains!

Thanks and Happy Thanksgiviing!!!

Beverly

__,_._,___
Pin It

Sunday, November 20, 2011

Peace on Earth

Sarah is back with a beautiful Christmas card!
 
Hello again and Happy Thanksgiving!!

There are only a few days left to accomplish all we need to get done prior to sitting down at the table to give thanks - and to stuff ourselves full of all the special foods we take so much time to prepare! So I decided this would be the perfect time to make a Christmas card. Better yet - a fairly simple and easy one, so as to save precious time that we all seem to need more of this time of year! 

I started out with a 5 3/4"x12" piece of textured green card stock, and folded it in half so that it is a tad taller (6") than wide (5 3/4"). I layered a red piece of card stock on top of the green, followed by a layer of brushed gold card stock. I wrapped a piece of green satin ribbon around the top two layers in the middle. Then I cut out my beautiful "wreath" using the awesome English Tea Party doily die from Cheery Lynn Designs. This was my first time using this die, and I just fell in love with it! The detail in it is amazing- and it cut out so beautifully!
 
I then added a circle of caramel colored card stock in the center to put my floral sticker on, and then just added a circle of Nestabling Petite Scalloped Circle gold rhinestones for bling! You just peel the whole circle off and stick it down - so quick and easy without having to try to space each rhinestone evenly. I just love all the Nestabling rhinestones and pearls!

For my sentiment I used the Spellbinders Fancy Tags dies and stamped onto an oval piece of gold card stock in black ink. And for a couple of little finishing touches I tied a bow using the Bow Easy tool (so great!) to add to the top of the wreath, and put a few little dew drops in two corners. 
Sarah Bennett
http://my-little-somethings.blogspot.com/

So now that I have my first Christmas card done - and it was so quick and easy - I am feeling a bit better about all that I have ahead of me yet to accomplish ;-)

With wishes for a very happy and blessed Thanksgiving,

Sarah 
 

Thanks, Sarah!!
 
Now is a great time to join the Classy Cards 'n Such Yahoo group here for exclusive weekly discounts!  Who doesn't need discounts during the holidays???


Thanks for stopping by!!!  Until next time...
 
 
Pin It

Friday, November 18, 2011

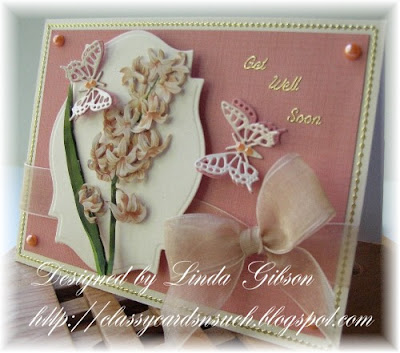
Lilac 3D Art from Linda

Linda has another of her beautiful creations to share.   This one is that oh-so-pretty and oh-so-easy 3D art!   Linda is a fan of pink and chose the lilacs to work with on this card.  The lilacs are included on a sheet of 3D art with two other beautiful flowers.  Linda used Spellbinders Labels Eighteen to cut the base for the lilacs.  She built dimension into the image by layering with the large Joy! foam pads as well as the small Joy! foam pads.  These tiny foam pads are so handy for small work like this!  And these sheets of foam pads last a LONG time...especially the small size.  The Crafter's Tools are ideal for placing these pads!

Linda die cut two white and two pink mini butterfliescombined alternate colors and shaped their wings for dimension.  She added pink pearls to their bodies and to the corners of the card.  The Get Well Soon sentiment is from the gold multi-sayings outline stickers.  She finished the card with a pretty light pink bow and a gold frame using fine border thick thin stickers.


Thanks, Linda!!!

In addition to the Classy Christmas Kits, how about a new Classy Christmas Embossing Bundle??  This bundle is designed to help you make great Christmas cards with a minimal time investment!  Who doesn't have time issues at this time of year?  I think most of us have time issues all year, but we are especially busy during the holidays!  This bundle is a bargain at $23.50!  If you purchased each item separately, the cost would be more than $27.00.  Order yours now!!  No promo code needed!!  The Embossing Bundle contains:
Only one new item in the shop this week but it is gorgeous!! It's the Spellbinders Layered Poinsettia and you can see it here.

More great sales here!

Thanks for stopping by!!!  Until next time...


Pin It

Tuesday, November 15, 2011

Like Classy Cards 'n Such on Facebook and cards to share

Find Classy Cards 'n Such on Facebook here!   It's a new adventure for me so it may take me a bit to get the hang of it, but here goes!


Remember a few posts ago when Jennipher said to let the patterned paper work for you?   That's exactly what I've done with the two birthday cards below!   So easy...just add a few little special touches and you are done!!

The first one is a DCWV card base from the Mariposa collection.  I wanted to match the theme of the card base, so I cut one of the small exotic butterflies from the Esse Smooth Pearlized White cardstock.  I added silver rhinestones down the body of the butterfly.   I didn't have the orange rhinestones at the time, so I colored the silver rhinestones with an orange Copic marker to match the card base.

I cut the layered mats with the Spellbinders Big Scalloped Ovals from paper from my stash.  BTW - the Scalloped Ovals sets are marked down in the Clearance section so get them while the price is so low!  I added pop dots between the mat layers for dimension and I was done!  Quick and easy!!

Beverly
Although this one was a birthday card, it's another one of those versatile cards that could be used for other occasions as well.  Try it!!


My second card was another quick and easy one to do.  The patterned paper is also from the Mariposa collection by DCWV and is cut from 12" x 12" paper and matted on paper from my stash.  I used a Martha Stewart punch on the left side.  I added a sentiment from the Inspirational Birthday Rubz and sponged Distress Ink around the edges of the oval.  I love using the Rubz even more since I've discovered using the stylus tool from the Paper Blossom Tool Kit by McGill.  It's a super easy and perfect release almost every time!   Of course, the stylus tools make flower making easy too!   Try them!!

I cut the mats using the Spellbinders Big Scalloped Ovals from paper in my stash.  I added the beautiful Brown Rhinestone Finesse Swirls above and below the sentiment. 

I finished the card with a gold butterfly sticker snipped right off the end of a border strip and then framed the card with gold lines stickers.

Beverly

All of the linked items above can be found in the Classy Cards 'n Such shop by clicking on the gold text.

Be sure to like Classy Cards 'n Such on Facebook!!

Thanks for stopping by!!!   Until next time...

Pin It

Monday, November 14, 2011

Pearl Rose card...Elisa K's first for Classy Cards 'n Such!!!

Here's Elisa's beautiful pearl rose card!

I'm so excited to be a part of Classy Cards 'n Such and to be sharing my love of all things paper and glue with all of you.

I have a very big weakness for Prima and couldn't help but use a few of my favorite Prima items on my first card.

I chose to work with the
Romantique Paper Collection because you just can't go wrong with the color combos and all the gorgeous patterns.  I paired it with the Pearl Flower from Prima, some fabulous satin ribbon, a die cut shape I had on my scrap table, some Prima bling and my favorite kraft cardstock.

Elisa K.
http://perpetualstew.blogspot.com/
Card instructions:

  • Trim cardstock to 8.5" x 5.5" and fold in half to create your card base.
  • Trim pattern paper to 5.25" x 4"
  • Distress edges of die cut shape and adhere to center of you pattern paper.
  • Peel off pearl flower from backing and adhere to the center of the die cut shape.
  • Add ribbon to pattern paper. Tie off into a bow and adhere to center of your card base.
  • Add a gem to each side of the die cut shape.
When you're ready to send your card to someone you can stamp a sentiment onto a piece of scrap paper, punch a hole and tie it to your bow.

I usually never add a sentiment to a card unless I know whom I sending it to.  That way if I need a card in a hurry I can grab my box of cards find one that I think will fit the occasion, stamp my sentiment and apply it to my card.


Thanks, Elisa!   What a pretty card!!!   Elisa will be back soon with another creation.


I've just lowered prices in the Clearance section, so please be sure to check them out.  Lots of great deals can be found there!

Between now and December 31st, every $50 in products purchased in a single order - after all discounts and before postage is added - will earn you $5.00 in store credit.   This is a great way to save on a Christmas gift for a friend or even for yourself!  These credits don't expire, so if you don't need them now, they will be good when you are ready for them. Full details here.

Thanks for stopping by!!!  Until next time...


Pin It

Saturday, November 12, 2011

Cameo Card

Here's another wonderful card from Sarah!
 
I am back again with another card made with wonderful things from Classy Cards 'n Such

This card was a lot of fun to make, as there are several really great embellishments on there. I just love embellishments! :-)

I started with a base layer of card stock and stamped it with a cheesecloth stamp in black archival ink.  Over that I put a layer of speckled ivory card stock which I roughed up and distressed. I followed it with a layer of black card stock just enough for a narrow border.
 
Then on went the beautiful patterned paper from the Webster's Pages collection Spring Market/Yacht Club/Country Estate pack . I wrapped two layers of wonderful lace ribbon around the top two papers. I love how the Ecru Delight Lace looks on top of the Black Elegance Lace! NOTE: These lace ribbons look so great in person, and the best part: the ecru lace is only 50 cents per yard, and the black lace is just 75 cents per yard! I only used a total of about 12 inches of each for this card. Seriously, I absolutely love these laces and will be stocking up on more. You just can't beat their value or elegance! :-)

As you can see, this Webster's Pages paper has some really cool images on it. I love the vintage-y feel to them! I knew when I chose this one that I wanted to make sure those cool birds did not go to waste or be covered up. And when I thought of using a stamped cameo image, the tag from the Spellbinders Fancy Tags Three die set came to mind to use as a frame. I love the Victorian look of these tags! And when I placed it under the birds I just loved it, and knew right away that the pearls would be my next addition.
 
I put a Prima flower in the corner, and then stamped the scripture in black archival ink. There were so many different sentiments I could have chosen from to make this a card for many different occasions: birthday, thank you, thinking of you, missing you... that's what I love about these papers: you can use them for almost anything depending on your mood or the occasion. 
 
 
Sarah Bennetthttp://my-little-somethings.blogspot.com/

Thanks for taking a look at my latest creation for Classy Cards 'n Such. I'll be back with another one soon!
 

Thanks, Sarah!!  All of the above linked items can be found in the Classy Cards 'n Such online shop.   Take a look!
 
Between now and December 31st, every $50 in products purchased in a single order - after all discounts and before postage is added - will earn you $5.00 in store credit.   Full details here.

All of the current discounts can be seen here.  There are some great deals to be had, so grab them now!
 
Thanks for stopping by!!!  Until next time...
 
 
Pin It