Friday, May 31, 2013

There are Always Flowers

Today I'm excited to introduce another new member of our guest design team!  Karen will also be designing for Classy Cards during June and July.   Our next designer will come on board in July, so stay tuned!
My name is Karen Letchworth, and my blog is called My Cup Runneth Over.  The reason I chose that name for my blog is because I feel truly blessed by God (my cup/life overflows with His goodness), and I want my art to reflect the love and the blessings He has given to me.  I love to create pretty, shabby, country and sweet creations of all sorts.  I was absolutely THRILLED to be invited to design here at Classy Cards 'n Such and I look forward to sharing with you all.  
I live in sunny Las Vegas with my hubby of 28 years, Darren, and our three beautiful children (Andrea-26, Alicia-20, and Andrew-14).  I look forward to meeting all of you, and invite you to visit my blog and become a new follower, and I will follow and visit your blogs in return.  It's SO exciting to design for Classy Cards 'n Such because the shop is just FILLED with such WONDERFUL products, and I hope to showcase them for you in a way that will inspire you to purchase and create!  It's SO nice meeting you all, and I can't wait to get started.

This card was created using a piece of white cardstock for the base, and then adding some patterned papers from the 6x6 Simple Stories Harvest Lane Paper Pad.  You can also see some stickers from this same Simple Stories line along with a length of Natural Trim to create a border across the card.  All my layers and trims are adhered to the card using Scor-Tape.  This lovely sentiment is from the Nature's Nested Sentiments Stamp Set by Just Rite Stampers, and is stamped on white cardstock using brown ink, and the edges are touched with Tim Holtz Bundled Sage Distress Ink.  There is a row of machine stitching along the edges to give this card a home-spun, country feel.  The final touches were made by adding a sweet little blue flower by Zva Creative and dusting the edges of my card base with Crystal Ice Glitter.  
You can find all the lovely products you will need at Classy Cards 'n Such to create a quick little card much like this one.  We would love to see what YOU will create using your supplies from Classy Cards 'n Such.  Happy crafting!
Thanks, Karen, for a cute country card!
Be sure to click on the gold links above to see and purchase the products Karen used.
Thanks for stopping by!!!  Until next time...


Pin It

Thursday, May 30, 2013

Beautiful Poppies!

I'm just thrilled to bring you five new guest designers over the course of the summer!   Misti is the first and I'm sure that we will all be inspired by her art.  Please give her a warm welcome, won't you?


Hi, my name is Misti Oblander & I am so excited to be one of the guest designers for June & July!!! When I got Beverly's email inviting me to be a guest, I was in the middle of an archery shop & let's just say, the guys that were standing close to me, just didn't get my excitement!!  LOL
  

I've been married to my husband, Kevin, for 17 years.  We have 2 boys, 11 & 9, whom we homeschool.  They are competitive archers & are super active with that.  I enjoy card making & seem to be a bit of challenge junkie!   My blog is A Card A Day.  Thank you, Beverly for the warm welcome.  I am so excited to be a guest for June & July.   I live in the far southwestern part of OK, 17 miles from the TX border.  

For this card, I pulled out the JustRite Poppies Labels Twenty Nine set and my Tim Holtz Distress Markers.  I used Peeled PaintBarn Door & Black Soot with the Tim Holtz Water Brush. I love that the Tim Holtz markers match his distress inks.  After watercoloring the image to my liking, I used the Spellbinders Labels Twenty-Nine to cut out my image.   The white panel in the back was created using the Scor-Buddy to give it a some texture.   A little bit of Black polka dot sheer ribbon & a few Baby Rhinestones in the corners complete this card. 


I spread my stuff over every inch of my desk, and I call that a successful afternoon!  I can't wait to come back & share my next project with you.  
Thanks, Misti, for such an elegant card!

Click any of the gold links above for more info and to purchase these products.

Thanks for stopping by!!!  Until next time...


Pin It

Tuesday, May 28, 2013

Peace in Purple

FREE SHIPPING 
ends at midnight, Wednesday, May 29th!
Hi, it's Holly posting today.  I needed a sympathy card for a sweet friend because her mother just passed away.  I kept this card sweet and simple and hopefully this will give her a little comfort in the days to come.


I started by cutting the Honey Blossom Frame from white cardstock.  This piece was set aside while I pulled out the gorgeous new Secret Garden 6x6 paper pad.  I die cut the purple script paper with the Debutante Frame (this matches the Honey Blossom Frame perfectly) and then adhered this to a layer of the solid purple paper from the Secret Garden paper pad.  The white Honey Blossom Frame die cut was glued directly on top of the purple script die cut.

The sentiment, from the With Sympathy stamp set (JustRite), was stamped with wisteria ink onto white cardstock.  I then cut this out with one of the Lacey Circles dies (Spellbinders) and adhered it to my card with Joy Foam Pads.


It's never easy to make sympathy cards, but it's nice to let people know you are thinking of them.  This card will be easy to recreate with different papers and different color combos.  It's always a good idea to make several to have on hand for those unexpected times when you need a sympathy card.
This post is Holly's last on the Classy Cards blog for the next few weeks.   Holly has had the honor of being asked to serve as a Guest Designer on the Cheery Lynn Designs blog for June!  Once she has completed her Guest Design term for Cheery Lynn, she'll be back with her wonderful designs  on the Classy Cards blog.   Leave her a little love, won't you??

Thanks for stopping by!!!   Until next time...


Pin It

Sunday, May 26, 2013

He Cares

Have you taken advantage of FREE SHIPPING yet?   No minimum order!   See all of the details here.  It won't last long so order now!!
\Hello everyone. It's Jenn posting today and I have an encouragement card to share with you. 


I started with a 5.25 x 5.25 card base made from Echo Bronze Stardream Metallic. Beautiful brown shimmery cardstock! To that I added a distressed layer of designer paper from the Bo Bunny Prairie Chic collection. This is a great collection for those of you that like to do shabby chic designs.

Next, using the Italian Flourish Doily Die, I die cut an elegant pink doily and added it to the bottom center of my card. I knew I wanted this doily to be my focal point so, using Lacy Circles I die cut a green lacy circle to stamp my Scripture on.

I knew I needed something across the upper part of my card to finish it off. I decided to use a border punch with the Echo Bronze Stardream Metallic and create a border for the top of my card.

To bring it all together like a beautiful package with a big bow, I used the Esse Smooth Pearlized Cocoa with the Large Bow Die from Impression Obsession and created a bow for the upper left corner. 

Thanks for a wonderful card, Jenn! 

Thanks for stopping by!!!  Until next time...


Pin It

Thursday, May 23, 2013

A Baby Carriage and FREE SHIPPING!!!


It's time for a FREE SHIPPING weekend!!! 

FREE SHIPPING on all domestic orders.
  
Maximum $6.50 off international orders.

Enter coupon code FREESHIP-ALL at checkout.  

Expires Wednesday, May 29th.


Good morning, Steph here again and I've got babies on the brain today.  My niece is having a baby soon and I knew this little Baby Carriage die from Memory Box would be perfect for a baby card.  

I started by creating a 5 1/2" square card from Burgundy Linen Cardstock.  This is a wonderful quality cardstock that is perfect for a card base.   You know I love the papers in the Love Letters Paper Pad and I had just the right papers left.  This paper pad has allowed me to create a lot of different cards.   Using three different sheets of pattern paper, I created the layers for the card.  Then I used Augusta Green Linen to cut the baby carriage.  Love the details of this die.
  

Before assembling the card, I wrapped ribbon around it and tied some Doodle Twine around it.  I mounted the baby carriage on two layers of Spellbinders Nested Oval Medallion Dies.  A little brown ink between the layers allows the two dies to stand out.  Joy Foam Adhesives behind the dies created a three dimensional effect.

 
The sentiment is a rub-on from My Sentiments Exactly.  It's actually from the Graduation pack, but I thought it was quite appropriate for this card.  I placed the sentiment on the card with a double layer of Joy Foam Adhesives as I needed it to stand apart from the card.

Click on any of the gold links above for more info.

Thanks for stopping by!!!  Until next time...


Pin It

Monday, May 20, 2013

Windows with Red Gingham Curtains


Hi, it's Holly posting today.  How about a sweet and simple window card for your inspiration today?


I had fun putting all these different die cuts together.  Basically, I started by cutting all the elements and then I glued them down onto a red card base.  I stamped the sentiment from the Floral Vintage Labels Two set with black ink directly below the window.  

The dies that I used are as follows:

Grand Madison Window - cut with white cardstock
Plush Curtains - cut with red cardstock for the valance
Plush Curtains - cut again with red gingham paper from Summer Fresh 6x6 paper pad
Walking Cat - cut with black cardstock

There's so many different colors, papers, and scenes you can create with this great window die.  Check out all the dies and stamps in the Classy Cards 'n Such store to get ideas for creating your own window cards.  :-)
Holly is right!  There are so many cute variations of this card that could be made.  Try your hand at it too, won't you??

Thanks for stopping by!!!   Until next time...


Pin It

Sunday, May 19, 2013

Blog candy WINNER!!!

Did you see Holly's cute Country Jar of Flowers card yesterday?   Vicki Romaine is the lucky winner of the Tall Canning Jar die cut from Memory Box offered on that post!


A note from Holly:

I love the ideas that all you ladies came up with.  Bumblebees would be adorable in this jar - that reminds me of the lightning bugs we used to catch when I was a kid.  How cute would it be to fill this jar with water and and have a fish or two in it?  My nephews would love that for a birthday card!  I love the idea of a ship in a bottle!  How creative is that?  Wouldn't that be nice for a Father's Day card??  And a vellum jar with vintage buttons would be so beautiful.  I can just see that in my head with lace and maybe a thimble and some scissors.....  oooohhh!!!   

Thank you so much for your comments and wonderful ideas, ladies!!
I appreciate everyone who commented with such great ideas!

Thanks for stopping by!!!  Until next time...


Pin It

Saturday, May 18, 2013

Country Jar of Flowers


Hey, it's Holly posting today.  I'm going country with this fun gingham paper and this rustic jar of flowers.  


I started with a piece of Kraft cardstock cut in half (4.25" x 11") and then folded it in half to make an A2 sized card.  I cut the red gingham paper from the Summer Fresh 6x6 paper pad (Simple Stories) to 3.25" x 5.5".  Some white paper was cut with the Country Girl Border die (Cheery Lynn Designs) and I glued it to the sides of the red gingham paper before adhering the paper to my kraft card base.


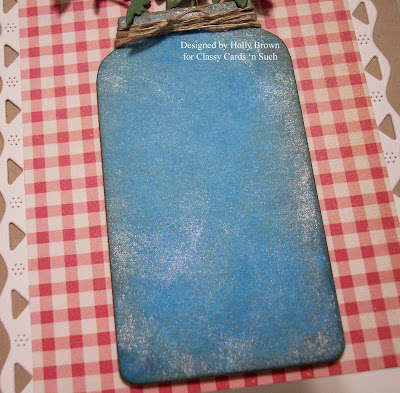
Next, I die cut the Tall Canning Jar from white cardstock.  I pulled out my Salty Ocean Distress Stain and dabbed it all over the jar.  Once this blue coloring dried, I dabbed some Brushed Pewter Distress Stain all over the blue jar and spritzed it with water to help the stain move.  I didn't want it to look completely silvery - I just wanted a hint of shine.  I let this dry and checked out the color.  Since I wanted a rustic country look, I sponged some brown ink around the edges.  You can see the shine as well as the sponging in this close up picture below.


I set the jar aside to dry completely while I cut out my flowers.  I die cut the Honey Blossom Sprig from green paper and then again from white paper.  I dabbed the white flowers with the Squeezed Lemonade Distress Stain and set it aside to dry.  Once it was dry, I cut out the pale yellow flowers and glued them over the top of the green ones.  I cut the lower pieces of the sprig off and arranged them all so they would fit into the jar and then taped the pieces down on the back.  I then wrapped some linen thread around the neck of the jar for that final country touch.  The jar was affixed to the red gingham paper with some Joy Foam Pads.  

This turned out so cute!  Now it's got me thinking what else I can put in that jar.  Any ideas from you crafty gals out there??  :-)
Post your ideas for the contents of this jar in comments on this post.   I'll pick one winner who will receive a Tall Canning Jar Memory Box die cut for blog candy on Sunday!   Comments must be posted by midnight Saturday night to be eligible!

Click any of the gold links above for more info.

Thanks for stopping by!!!   Until next time...


Pin It

Thursday, May 16, 2013

Basket Tutorial

15% off through Thursday, May 23rd!

Enter coupon code  D-LITES (all caps, no spaces) at checkout.  
More details here


Hi everyone!   Steph here.  Today, I wanted to share a basket I made using the Vintage Label and Banner dies.  This set, made to mirror JustRite stamps, contains two vintage labels and three different sizes/shapes of banner dies.  

Looking for a tone-on-tone effect, I stamped the leaf stamp from Heartfelt Creation's Classic Bella Rose stamp set onto each of the smaller vintage labels with Pumice Stone Distress Ink.  Then I embossed each piece with Clear Fine Detail embossing powder by Sparkle 'n Sprinkle.  Love the embossed effect! 


To create a sturdy base, cut chipboard 4 3/4" x 4 3/4".  Using a Scor-Buddy, score 1/2" around all 4 sides and fold.  Cut the small squares from each corner.  


Using Scor-Tape, apply to the chipboard edges and then adhere the large vintage labels.  Add Pumice Stone Distress Ink where necessary to cover the chipboard.  


Once the labels were adhered, I carefully cut around the labels, making the chipboard less prominent.

To create the handle, cut a 1" x 11" strip from Esse Smooth Pearlized Cocoa Cardstock. Stamp the leaf stamp from Heartfelt Creation's Classic Bella Rose stamp set repeatedly along the strip with Pumice Stone Distress Ink,  then emboss with Clear Fine Detail embossing powder.  For a strong hold, apply Scor-Tape to the edges of the handle and adhere to opposite sides of the basket.

To finish the inside of the basket, adhere the large black vintage labels to the sides and a piece of black cardstock on the base.

Punch a hole in each side of the basket and tie with Doodle Twine.


This is a really nice sized basket and would be perfect to place candies or even a few flowers inside.
Cute basket!  Thanks, Steph!!

Click any of the gold links above for more info.

Thanks for stopping by!!!  Until next time...


Pin It

Monday, May 13, 2013

Honeybees in a Frame


Hi, it's Holly posting today.  Have you seen the great new Memory Box dies in the store lately?  I ordered these as soon as I saw them, and I am in love with these new frames.  I think I'm going to have to pick up a few more - they are just gorgeous!


I started this card by die cutting the new Honey Blossom Frame from green paper.  I cut it again with a soft yellow paper and cut out the flowers and glued them on top of the green ones.  It's a little time consuming but so easy and the results are so pretty.  I then cut some white paper with the Debutante Frame die and sponged it with blue ink around a scratch paper Classic Scallop Oval (Spellbinders) die cut.  This is how I created my cloudy sky background.  Some glue was lightly applied around the back of the frame and I pressed it onto my cloudy background piece.

Next, I die cut the fun Honey Bee Skep (beehive) from soft yellow paper.  To give this some realism, I sponged some saffron ink around the edges and then I took a marker and colored in all the horizontal grooves.  The little door was colored with a dark brown marker and then taped in place on the backside.  This beehive was affixed to the card with some Joy Foam Pads (small).

The Jolly Bumblebees were cut twice - once from dark brown paper and once from soft yellow paper.  I then glued the appropriate pieces to the bodies and glued them down onto my card.  The last thing I did was stamp the sentiment from Anytime Sentiments (Impression Obsession) with dark brown ink onto the lower right corner of my cloudy background.  

These frames are perfectly sized for a regular A2 card.  The Debutante die goes with all of these larger frames, such as Honey Blossom Frame and Twirling Vine Frame.  These are in the store now with more to come.
Great job, Holly!  Thanks!!

Click any of the gold links above to purchase any of the wonderful products Holly used.

Thanks for stopping by!!!  Until next time...


Pin It