Tuesday, April 30, 2013

Bling-y Floral Friends


Hi Classy Friends!  It's Holly posting today and I am sharing this bling-y floral card with y'all.


I pulled out my Vintage Bliss 6x6 paper pad (Simple Stories) and cut the blue chevron paper and the floral paper and adhered them to a white card base.  Next, I cut some orange paper into a small rectangle and cut a smaller piece of white paper.  I stamped this beautiful sentiment from the Floral Vintage Labels 2 set (JustRite) with black ink onto the white paper.  

Now here's the fun part - playing with the new Cheery Lynn Designs dies that were just released a couple weeks ago.  I started by cutting some orange paper with the new City Girl Edger and I adhered it to the bottom of my sentiment piece.  The blue flower was cut with the new Shasta Daisy Strip die (gorgeous!) and the orange flower was cut with the new Sweet William Strip die (love the new smaller sizes!).  I fastened both flowers together with some rhinestone brads.  

I added a piece of the Silver Rhinestone Swirls across the sentiment piece and up into the floral paper.  The blue and orange flowers were affixed at the bottom of the rhinestone swirl.  I die cut some leaves from the new Ivy Strip die (Cheery Lynn Designs) and tucked them in around the flowers.  The last thing I did was cut a piece of Chalk White seam binding, tied it into a bow, and glued it down under the leaves in the corner.

Have you ordered any of the new Cheery Lynn Designs dies from the Classy Cards 'n Such store yet?  You will love playing with these new dies.  I am certainly having a great time creating with them!  :-)
So cute!   Thanks, Holly!

Have you Pinned to Win yet?    You could win a $25 gift certificate to the Classy Cards shop!  It's really easy!!  All of the details are here!   Contest ends Saturday, May 4th.

Click any of the gold links above for more details.

Thanks for stopping by!!!  Until next time...


Pin It

Monday, April 29, 2013

Mother's Day Flowers


Good morning, Steph here again and I'm in love with this new paper collection from Simple Stories.  It's called Vintage Bliss and it's packed with 24 double sided sheets of amazing patterns, designs and colors.  Not only is it perfect for vintage cards and Mother's Day cards, but I can also see some Father's Day and Graduation cards with this paper pad.

Today, I selected a wood grain pattern from this collection.  After inking it with brown ink, I mounted it on a piece of Reich Shine Champagne which I cut to fit my card base. 


I used the reverse side of the wood grain paper to hold the Mother's Day sentiment which is a rub on from My Sentiments Exactly, placing it across the card.  After inking it with brown ink, I found this lovely Ivory Cotton Teardrop Trim which was perfect for adding just the right amount of femininity I was looking for.


The poppy stamp is from JustRite Stampers Poppies Labels Twenty-Nine.  I colored them with Copic Markers, then used Spellbinders Grand Big Scalloped Ovals to die cut the image. After inking with brown ink, I die cut a larger oval from Wausau Index Green Cardstock.  For a little bling, I used a Gelly Roll Stardust Clear Pen in the center of the flowers.

The image was then mounted to the card with Joy Foam Adhesives  giving it a little dimension.

Love those poppies, don't you??   And even better, they are ON SALE!!  All of the flower stamps are on sale through Thursday so get yours now!   Details are here!!!

Thanks for stopping by!!!  Until next time...


Pin It

Saturday, April 27, 2013

Sunshine and Butterflies

Hi everyone!   It's Jenn posting today.  I've been wanting to design something with this beautiful sunflower designer paper from the Graphic45 French Country Collection for some time now. It's so vivid and timeless I just had to showcase it. 

I started with a Cherry Cobbler card base that measures 4.25 x 5.5. I cut the length and width of the sunflower patterned paper a quarter inch smaller and adhered it to the base. 

Next using the Cheery Lynn Designs Lace Deco Corners A and Summer Sun cardstock I cut out two corners for the top left and bottom right of the card. Still working with Summer Sun cardstock, I used Spellbinders Decorative Labels Eight to die cut a label for my sentiment.

For embellishment and finishing touches, I used the opposite side of the sunflower patterned paper and die-cut two butterflies facing them in opposite directions on the card. I added some Brown Baby Rhinestones to the centers of the butterflies to create the bodies.


Thanks, Jenn!  Definitely a day brightener!

If you love great weekly deals, be sure to sign up for the Classy Cards newsletter in the upper left corner of this blog under the pink envelope!

Thanks for stopping by!!!  Until next time...


Pin It

Friday, April 26, 2013

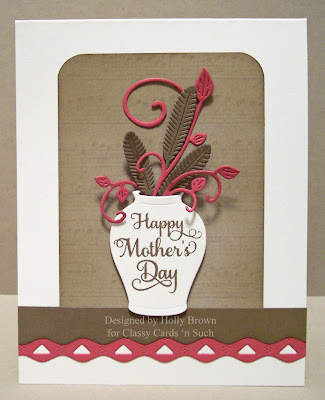
Feathers in Vase Mother's Day card


Hi Classy friends!  It's Holly posting today and I've been playing with some of the wonderful new Cheery Lynn Designs dies.  
 

I love the new vases and the new dream catcher dies.  The feathers are from the Dream Catchers #2 (Cheery Lynn Designs) set.  These sold out immediately within hours of being available in the store, and there is another shipment en route.  That's why you will see the "Pre-order" notice on this particular item right now.  

When I set about making this card, I had Mother's Day on my mind.  I knew I wanted to do something different.  When I saw the feathers in this Dream Catchers #2 (Cheery Lynn Designs) die, it niggled in my brain as a possible cool alternative to flowers.  When I saw the Vase (set of 4 from Cheery Lynn Designs) die set, my plan fell into place.  Yup, feathers in a vase instead of flowers - totally PERFECT!!!

Since I was already doing a "different" card, I decided I wanted to go with non-traditional colors for my card.  That meant no pastels, no flowery papers, no obvious "girly" stuff.  So I pulled out a piece of Kraft cardstock and stamped it with the Shabby Music background stamp (JustRite) and then sponged the edges with a brown ink.  I adhered this music piece to a vanilla card base, and then I pulled out my Country Girl border die (Cheery Lynn Designs).  I die cut the border from dark brown cardstock as well as a deep rose cardstock.  I cut the deep rose Country Girl border in half lengthwise and adhered it below my music background piece.  I then set aside my dark brown Country Girl border piece and picked up the negative piece (the outside part you would normally throw away) and affixed it over the music background piece and the deep rose border piece.  I love how it fits so perfectly over the triangles in the deep rose border.

The Vase (Cheery Lynn Designs) was cut from vanilla cardstock and I stamped the sentiment from the Hugs & Kisses Sentiments set (JustRite) directly onto the vase.  I cut the Mini Fanciful Flourish (Cheery Lynn Designs) from the same deep rose cardstock and inserted it into the top of the vase.  Then I cut the feathers from the Dream Catchers #2 set (Cheery Lynn Designs) from dark brown cardstock and arranged them inside the vase with the mini flourish.  The vase was affixed to my card with some Joy Foam Pads.

I hope you've enjoyed this non-traditional Mother's Day card!  :-)
Thanks, Holly!   Your non-traditional card can spark some ideas!  It should only take a few days for the next shipment of Dream Catchers #2 to arrive, so order yours now!

Now through Thursday, May 2nd all flower stamps are 15% off!  There are more than 20 great stamps to choose from.  Enter coupon code FLOWERSTAMP  at checkout!


Be sure to PIN to WIN!!!  Two $25 gift certificates are up for 

grabs and you could be a winner!   Details here!  Good 

luck!!!


Click any of the gold links above for more info!


Thanks for stopping by!!!  Until next time...


Pin It

Wednesday, April 24, 2013

Sending Love to You

Good morning! Steph here with another card using these awesome papers from Webster's Pages - Ladies & Gents Trendsetters paper pack.  I really wanted to focus on the beauty and uniqueness of these papers so I kept the card fairly simple.   Because of the touches of gold in these papers, I used Super Gold Metallic paper for the card base, layering the papers on top.


The sentiment is from JustRite Stampers Hugs & Kisses Sentiments.   Since these stamps are clear, it's easy to place them exactly where you want them.  As  I wanted to use Spellbinder's Fancy Tags, which I also die cut from these papers, I die cut the tag first then stamped the sentiment perfectly across the tag.


Wouldn't this be a cute Father's Day card?  There aren't many Ladies, Gents and Trendsetters paper pads left and they won't be re-stocked once sold out, so get yours today!  Thanks, Steph!

There is a lot of pinning going on with Classy Cards products and blog cards!  Have you Pinned to Win to be eligible to win a $25 gift certificate to the Classy Cards shop?  It's very easy and you can find all of the details here!

Thanks for stopping by!!!  Until next time...


Pin It

Sunday, April 21, 2013

Blossom Birds

Hi everyone!   It's Steph posting today. This fabulous Stampavie Stamp is called Blossom Birds. I prefer creating 5" x 6 1/2" cards and this larger stamp is perfect for me.  I colored the image with Copic Markers and added a little glitz with a Stardust Gelly Roll Pen to the flower centers before cutting out the image.

If you haven't seen the new Memory Box dies in the store, you have  to check them out.  They are simply awesome!  For the frame around my stamped image, I used the new Memory Box Twirling Vine Frame. This is an intricate die that can be used with most die cutting systems.  I had an issue cutting the frames at first and was about to discard my black piece until I realized it would be great as a mat for the green cardstock frame, so I adhered them together.   For the background, I used a glitter sheet from Trim Craft's Love Letters Paper Pad.

A close up of the stamped image fitting perfectly inside the frame.  This frame has tremendous possibilities!!!  The sentiment is from Justrite Stamper's Topsy Turvy Cakes.


What a beautiful little bird!!  Thanks, Steph!!

Have you pinned to win yet??  You do need to be signed into Pinterest to play.  You could win a $25 gift certificate from the Classy Cards shop!   Details are here.

Thanks for stopping by!!!  Until next time...


Pin It

Saturday, April 20, 2013

Pin to WIN!!!


Would you like to win FREE product from the Classy Cards 'n Such shop???  It's so easy!  

Here's how to win:
  • Click here and follow Classy Cards on Pinterest.  Here's the direct link if you need it since the Pinterest board is in my name:  http://pinterest.com/beverlybohannon/boards/
  • Pin 20 of your favorite Classy Cards samples from this blog or products from the Classy Cards shop onto a board called Classy Cards 'n Such Spring 13 Favorites.  Items with a Spring theme are preferred but not required.
  • Email your board's link to beverly@classycardsnsuch.com
  • Winners will receive a $25.00 Classy Cards gift certificate which can be used on any items in the Classy Cards shop.
  • Two random winners will be chosen for every 50 submissions
  • Contest ends Saturday, May 4th
Don't have a Pinterest board?   Click here to get started.

Happy pinning!!!


Pin It

Friday, April 19, 2013

Grace


It's Jenn posting today.   I really love the different patterns and color combinations in the Laced with Grace Designer Paper Collection by Glitz Designs. Each pattern already has a pre-distressed look to it and since I love distressing anyway, that just makes me love the collection even more. Today I decided to work with the pale teals in the collection. One pattern in particular was jumping out at me (the zebra stripes) and that's how I came up with my teal and black color combination for the basis of this card. 


My card base measures 5.5" square. For my first layer, I distressed the edges of the solid teal pattern with the sheet music on it and then inked the distressed edges with Black Soot Distress Ink. Using the largest circle from Spellbinders Lacey Circles,I cut out a lacey circle from the teal zebra print pattern and adhered that in the center. Next, I cut out a 2.5" x 4.5" rectangle from the teal ledger pattern and matted it on black cardstock; placing it on top of the circle.

With the basics of my card done, it's time to get fancy! Using the Spellbinders D-Lites Fantastic Flourish One and black cardstock I cut out a flourish and placed it off-center to the left. I added a couple drops of Mint Green Liquid Pearls to the flower centers to make them stand out. Using Very Vanilla cardstock and Spellbinders Decorative Labels Eight, I cut out a label and stamped my sentiment. To finish things off, I added one Prima Calcutta Mini in Willow.  


Thanks, Jenn!!  I love the way you used the flourish!

Click any of the gold links above for more info on the products Jenn used.

Thanks for stopping by!!!  Until next time...


Pin It

Wednesday, April 17, 2013

Glittery Purple Card


Hi, it's Holly posting today.  I was in the mood for a glittery card, so I pulled out some gorgeous Lacy Lilac glitter and made this card to share with you.


Wanna see a close-up of that fabulous glitter??  Here ya go:


 I started with a white card base and I added a layer of a shimmery amethyst cardstock.  I die cut the Mesh border (Cheery Lynn Designs) with white cardstock and cut a little "v" at the bottom with some scissors.  I cut the Lady Kate Edger (Cheery Lynn Designs) with white cardstock, painted it with a shimmery lilac paint and adhered it to the sides of the Mesh border before affixing this to my purple background.  

Next, I die cut a white oval, embossed it with a dotted embossing folder and set it aside.  I cut another oval with a smaller oval die inside to create the frame.  I covered this frame with glue and then poured the Lacy Lilac glitter on top.  After shaking off the excess glitter and returning it back to the jar, I glued this frame to my white oval and then glued this down on top of the mesh border.

While I still had the glitter out, I found a large brad, covered it with glue, and then dipped it into the Lacy Lilac glitter.  I set this aside to dry while I die cut my leaves and flowers.

The leaves were die cut from the Flourish Leaf Strip (Cheery Lynn Designs) and the flower petals were cut from the Sweet William dies (Cheery Lynn Designs).  I sponged some purple ink onto the edges of the flower petals and then curled the petals with my fingers.  I carefully arranged the flowers (2 of the smaller size, 3 of the larger size) and pushed the glittery brad through the centers and fastened the brad in the back.  This flower was affixed to my card and then I adhered the leaves underneath.

I love how this card turned out!  That glitter makes me happy!!  Check out all the colors of glitter in the store HERE.  Which color would you use to make a card like this?  

I love the purple and the glitter, but it would also be gorgeous in your favorite color!

Click any of the gold links to find the products Holly used!

Thanks for stopping by!!!  Until next time...


Pin It

Tuesday, April 16, 2013

Country Red Daisy


Hi folks!  It's Holly posting today.  How about a sweet little red daisy to put a smile on your face?


I had a fun time playing with some new Trendy Tape on this card.  See the red polka dot strips?  That's the Trendy Tape in Polka Dot Red - a self-adhesive paper tape that is easily removable if you stick it down in the wrong spot.  No need for glue or scissors - just unroll it, press it down where you want it, and then tear the end off just like you do with masking tape.  So easy and so fun!  Now I want to get all the other colors of this fun Trendy Tape!  You can find all the colors by looking under the Embellish tab and scrolling down and going to the next few pages.  :-)

After I put the tape down where I wanted it (four strips), I stamped the sentiment from Anytime Sentiments (Impression Obsession) in the middle.  The patterned paper on the left side is a piece that I cut out from the Summer Fresh 6x6 paper pad (Simple Stories).  

For my flower, I first die cut some leaves from the Rose Leaf Strip (Cheery Lynn Designs) and then some daisies from the Daisy Strip (Cheery Lynn Designs).  I stacked three different sizes of daisies up and glued them together.  The leaves were glued to the back of the red daisy and then the whole thing was glued down on the patterned paper rectangle.  I finished off the daisy by affixing a white button tied with twine in the center.

I like the country-ish feel of this card.  It's fun, flirty, and simple - perfect for a sweet country girl who needs a smile in her mailbox.  :-)
I think even a city girl might smile when she receives a card as cute as this one, don't you??

Click any of the gold links above to get more info or purchase the products Holly used.

Thanks for stopping by!!!  Until next time...


Pin It

Monday, April 15, 2013

Sympathy, NEW Cheery Lynn release is here!

Good morning, Steph here today with a sympathy card. Unfortunately, as we get older, there will come a time when we need to send a number of sympathy cards.   I selected  papers from the Webster's Pages Ladies and Gents paper pad.  This 6" x 6" collection is full of rich as well as muted color tones and many different designs.  


I tied some Ivory Cotton Teardrop Lace around the center of the card and then tied yellow Doodle Twine around the Lace.

Using JustRite's With Sympathy stamp set, I stamped the sentiment and then die cut it using Spellbinders Nested Oval Medallion Dies.  I die cut a larger mat from cardstock for the sentiment and added it to the card front using Joy Foam Adhesives for dimension. 
Thanks, Steph for a beautiful sympathy card!

The April 2013 release from Cheery Lynn Designs is now in the Classy Cards shop!   You can see it all and much more in the NEW!!! section of the shop.  Get yours now while supplies last!

Click any of the gold links above for more info!

Thanks for stopping by!!!  Until next time...


Pin It

Sunday, April 14, 2013

Mother's Day Flowers


Good morning, Steph here and I'm thinking about Mother's Day, aren't you?  My mother always loved receiving my cards and I know she would have loved this one.
 
I used the Summer Flowers embossing folder.  I love the incredible details this embossing folder creates.
 
 
Here's a tip for using this embossing folder:  cut your cardstock to fit before embossing it.  This way you won't damage your embossed piece if you need to cut it smaller.
 
While the embossed piece itself is gorgeous, I wanted some color, so I lightly ran my ink pads across the embossed sections to get a really great effect.  I used Ranger Distress Inks in Rusty Hinge, Bundled Sage and Walnut Ink, randomly running the pads across the design.  After I had the look I wanted, I inked around the edges with Rusty Hinge and Walnut Ink.
 
The sentiment is from JustRite's Hugs & Kisses Sentiments.
 
 
I used the larger Joy Foam Adhesives between my layers.  I also added three White Pearls to the flower centers.


Thanks, Steph!  

Just think...you could easily do this same card in your mom's favorite colors!!

JustRite stamp sets, including the one Steph used, are on sale this week!   Get all of the details here.

Thanks for stopping by!!!  Until next time...


Pin It