Thursday, April 11, 2013

Reverence & Grace

Hi everyone!  It's Jenn posting today.  New in the Classy Cards 'n Such store is the Reverence M-Bossabilities  embossing folder by Spellbinders. I love the designs on both sides; one being crosses and the other being lilies and both are appropriate for Faith-based cards or cards of encouragement and comfort.  I created a simple yet elegant card using the folder so that you could see just how beautiful the details are. 


I started with a pre-made card base that measured 5.5 x 6. Using a piece of Champagne - Reich Shine cardstock that measured 5.25 x 5.75, I embossed it using the crosses and filigrees side of the embossing folder. With the beautiful shimmer from the Champagne Reich Shine and the incredible detail from the Reverence embossing folder, I knew that I couldn't add much more to this card or it would lose it's elegance.

With that being said, I used Spellbinders Fancy Tags to stamp my sentiment on and popped it up with foam pads. I needed just a little something else to complete the card so, I decided to decorate the corners with Cheery Lynn Designs Lace Deco Corner E. In between my decorative corners and sentiment you can see all the fantastic detail of the Reverence embossing folder. It measures 5 x 7 so it is perfect for making larger cards as I tend to do. Definitely a must have!


Beautiful card, Jenn!!

The Spring 2013 Memory Box release has arrived and is ready to ship!   Get yours now!!  You can see all of the Memory Box die cuts here.

Thanks for stopping by!!!  Until next time...


Pin It

Tuesday, April 9, 2013

Crinoline Daisy and Hexagons

Hi Classy folks!  It's Holly posting today, and I've been playing with some of the new paper pads and a Distress Stain ink color.  You should see my fingers - hot pink!  LOL


My card today starts with a white card base and I added a layer of the pretty soft blue paper from the Secret Garden 6x6 paper pad.  I stamped the sentiment from the Anytime Sentiments set (Impression Obsession) with some brown ink at the bottom of the blue paper.  I set this aside and worked on the hexagon layer.

For this hexagon layer, I adhered a piece of Kraft cardstock to a slightly larger layer of white cardstock.  I then used the Honeycomb die (Cheery Lynn Designs) and cut some white cardstock, some more of the soft blue paper from the Secret Garden pad, and two papers (pink and green) from the new Prairie Chic 6x6 paper pad.  

I trimmed the white honeycomb frame down with scissors so I would just have three "rows" of hexagons and I glued this down onto my Kraft cardstock piece.  I then adhered the green, pink and blue die cut papers into each of the hexagon rows.  Some pale pink ribbon was wrapped around the bottom of this hexagon layer and I used the Bow Easy tool to make a double looped bow.  

For the pink flower, I pulled out the Daisy Strip die (Cheery Lynn Designs) and die cut some crinoline-type fabric.  It cuts beautifully!  The fabric was white, so I pulled out the Picked Raspberry Distress Stain and dabbed it all over the daisy pieces.  Once the fabric daisies were dry, I stacked them up and pushed a silver brad through the center and then affixed this to the top of my double looped bow.  I used my fingers to fluff up the petals, which sort of distressed them a little bit.  Perfect for a country-ish card!  

Don't be afraid to use your Cheery Lynn Designs dies to cut fabric as well as paper.  Experiment with different kinds of fabric and have fun!  
Cute card, Holly!

Click any of the gold links above to see the products Holly used on her card.

Thanks for stopping by!!!  Until next time...


Pin It

Monday, April 8, 2013

A Rose for You

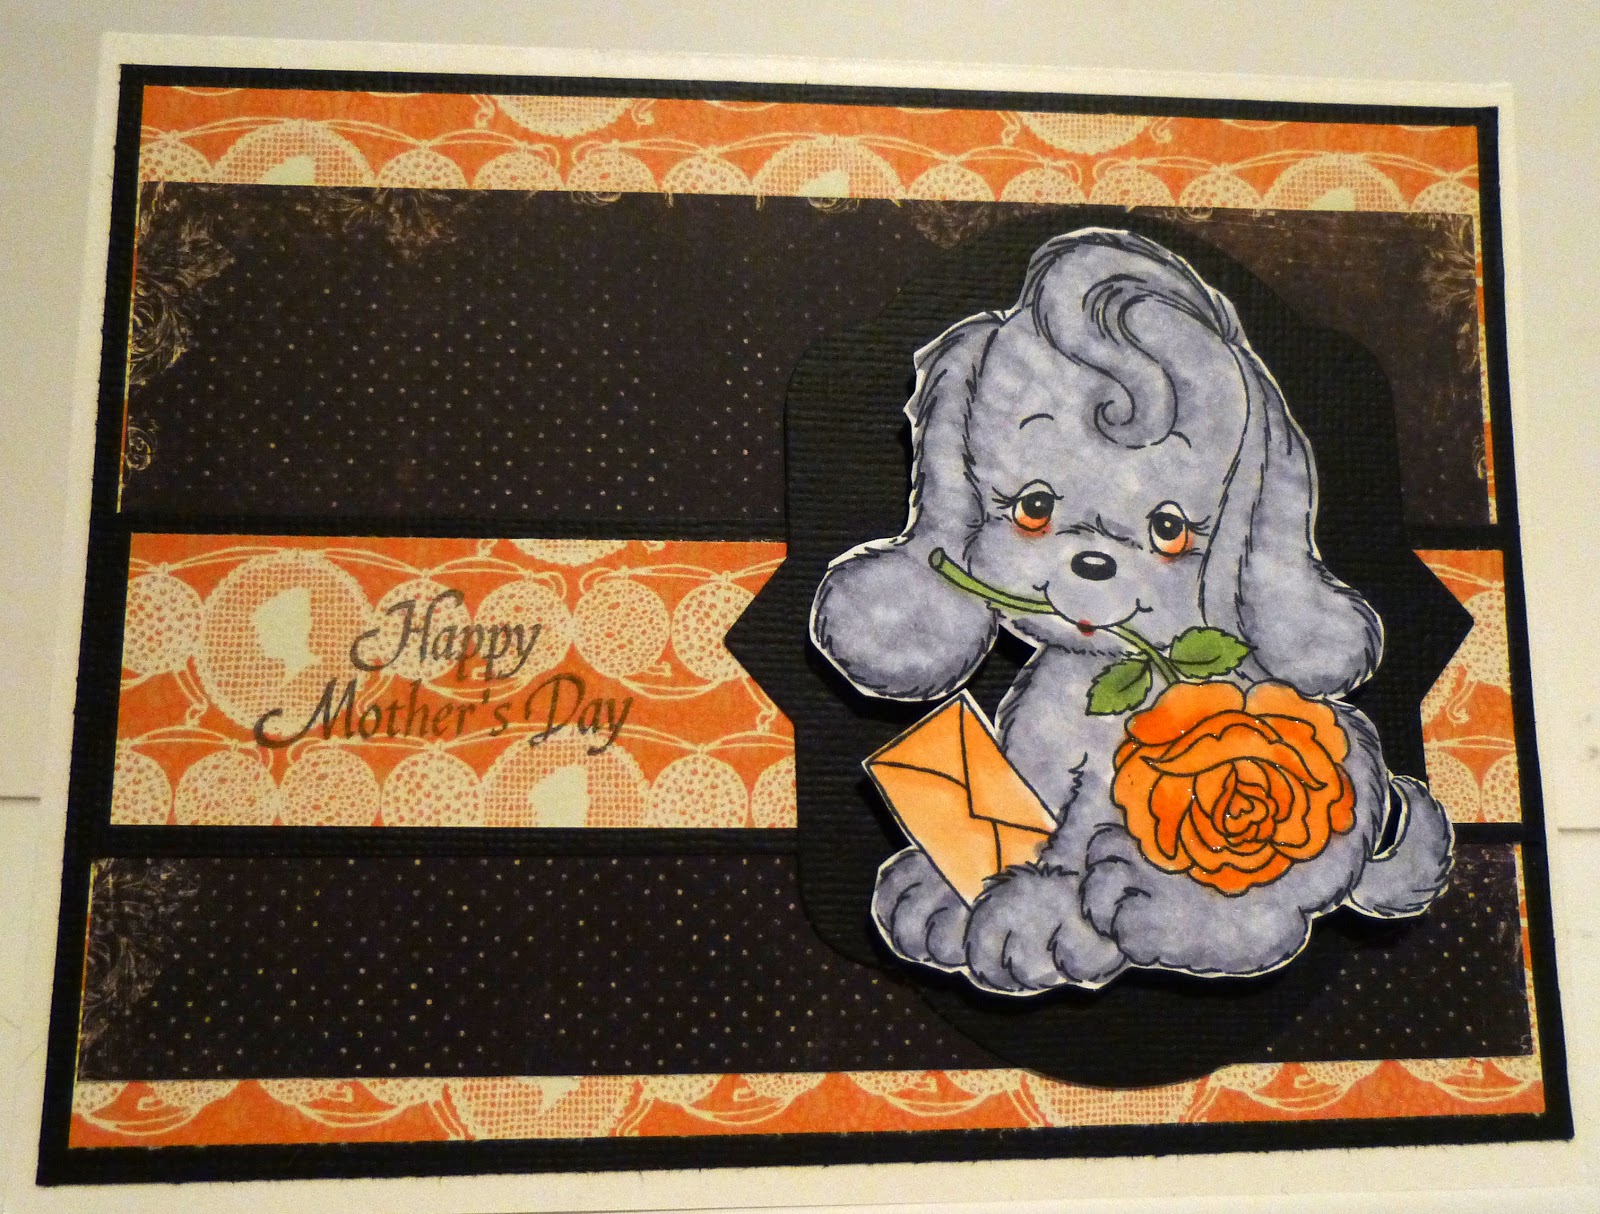
Good morning! Steph here with another card with this cute puppy from Stampavie - A Rose for You.  I love that you have so many options with this stamp.  You can easily create a love themed card, a friendship card, a wedding card and even a Mother's Day card, as I have here.  The possibilities are endless - just switch up your papers, your colors and your sentiments.

I used papers from Webster's Pages Ladies & Gents Trendsetters paper pad along with papers from  Glitz Designs Pretty in Pink paper pad, layering them together.  The sentiment is from JustRite Stampers Spring Words, which I stamped on the pattern paper before adhering it across the center of the card.


The pup was colored with Copic Markers in shades of gray, while the rose and envelope were colored with Copic Markers in shades of orange and green.  Since I wanted the pup to be prominent, I used Spellbinders Nested Oval Medallion Labels to die cut black cardstock and then I mounted the pup on top with Joy Foam Adhesives.

Cute puppy, Steph!

Have you subscribed to the Classy Cards newsletter yet?   Newsletter subscribers get the best weekly deals!  Subscribe now on the Classy Cards blog under the pink envelope!

Click any of the gold links above to see more info about the products Steph used.

Thanks for stopping by!!!  Until next time...


Pin It

Sunday, April 7, 2013

Deepest Sympathy

Hi everyone!  It's Jenn posting today.  None of us really like to think about it but unfortunately, there are times when we least expect it and we need a sympathy card. So, I like to make at least one sympathy card a month to have on hand. 


I started with a 5.5" square card base of Stardream Emerald. It has such a beautiful subtle sheen to it and really coordinated well with the greenery in the designer paper from the Webster's Pages Ladies & Gents/Trendsetters Collection Combo Pack. This collection is also in the clearance section of the store now! Since I already knew in my mind that I wanted to work with the 3-D Die-cut Red Roses, I chose a rose pattern to add to the base of my card. 

Before I assembled my rose I knew that I wanted a nice base to display it on. I used the French Pastry Doily Die and the Stardream Chiara Coral cardstock to create a lovely pale pink doily to mat the rose on. Then I began to assemble the rose using foam pads.

For finishing touches, I added a Mini Flourish Band in Stardream Emerald. 


What a beautiful card, Jenn!!!

Click any of the gold links above to see the products Jenn used and to purchase if you wish!

There are LOTS of new products in the Classy Cards shop this week!!  You can see them all by clicking here.

Thanks for stopping by!!!  Until next time...


Pin It

Thursday, April 4, 2013

Honeycomb Flower

Hi folks!  It's Holly posting today, and I created something a bit different to share with y'all.  


How do you like my cute Honeycomb Flower?  :-)  I cut out the Honeycomb Frame (Cheery Lynn Designs) and then used my scissors to snip certain sections out to create this fun flower.  I then glued it down onto the red gingham paper from the Summer Fresh 6x6 paper pad and cut off the excess paper from the edges.  A reserved brown piece from the frame was glued to the center.

For my focal layer, I cut a piece of white cardstock and sponged some Tumbled Glass distress ink around the edges.  I cut out the stem and a leaf from the new Orchid die (Cheery Lynn Designs) and glued them down, and then I die cut the Grass border (Cheery Lynn Designs) and glued that to the bottom.  The Honeycomb Flower was glued to the top of the green stem.  

I die cut the Hugs sentiment (Cheery Lynn Designs) and adhered the smaller version to my card, and then I pulled out the Tiny Things with Wings die (Cheery Lynn Designs) and cut the honeybee twice (once with white cardstock and once with brown cardstock).  On the white bee piece, I used my Squeezed Lemonade Distress Stain to color it a soft yellow hue.  Once that was dry, I glued the dark brown bee piece on top of the yellow piece to create the bee.  The bee was glued down next to my Honeycomb Flower and I pulled the wings up so it looks like it is fluttering around on my card.

This scenic layer was glued to a red layer and then affixed to a white card base that was sponged with Antique Linen Distress Ink.  I love this fun gingham Honeycomb Flower.  Just think of all the different papers you could put inside this flower!  
Very cute, Holly!

Click on any of the gold links above to see or order the products Holly used.

Thanks for stopping by!!!  Until next time...


Pin It

Tuesday, April 2, 2013

Floral Cameo for Mother's Day!

Hi, it's Holly posting today.  Have you played with the beautiful resin cameos from the Classy Cards 'n Such store?  I shared a card with a blue cameo on it a couple months ago, and I've got another card to share with you today using these gorgeous pink flower cameos.


I started with a kraft card base and I stamped the sentiment from the Hugs and Kisses Sentiments set (JustRite) at the bottom.  The pink layer has been cut on the bottom with the Lady Kate edger die (Cheery Lynn Designs).  I embossed the vanilla layer with the Garden Lattice embossing folder and just lightly rubbed some Antique Linen distress ink across the embossed areas.  Some brown ribbon was tied around the embossed layer and simply knotted on the side.

I die cut the pink scallop oval with the Classic Scallop Oval Large die (Spellbinders) and then added a kraft layer die cut with a Labels 18 die (Spellbinders).  A vanilla oval was die cut with an oval die and I adhered the Pink Floral cameo in the center.

My grandmother's favorite color is pink, and this card will be perfect to give to her in May for Mother's Day.  She will adore this gorgeous cameo.  :-)
So pretty, Holly!  

Be sure to check out the weekly deals here!  Paper pads are on sale through Thursday, April 4th.  Don't miss out on a great bargain!!

Click any of the gold links above for more info and to purchase any of the items Holly used on her beautiful card.

Thanks for stopping by!!!  Until next time...


Pin It

Monday, April 1, 2013

Simple Things


Hey, it's Holly posting today, and I've got a fun and bright card to share.  I pulled out my Summer Fresh 6x6 paper pad from Simple Stories and I was inspired to create this fun and colorful card.


The first thing I did was cut out that sentiment block from the back of the Summer Fresh paper pad.  I love the sentiment and the flowery border around it.  The colors in that flowery border inspired the choices for the rest of my card.  

I cut the yellow polka dot paper from the Summer Fresh paper pad to 5.25" by 4" and adhered it to a sheet of dark blue cardstock that was cut to 5 3/8" by 4 1/8".  I pulled out some red cardstock and the new Mesh Border die (Cheery Lynn Designs), cut out my border, and adhered it to the yellow polka dot paper.  Some Chalk White seam binding was wrapped around the card over the red mesh border and adhered to the back.  I then adhered these layers to a vanilla card base.

The "simple things" sentiment was adhered to my card with Joy Foam Pads and I tied a bow from the Chalk White seam binding and adhered it just above the sentiment.  The beautiful butterfly (from the Exotic Butterflies small #2 die set - Cheery Lynn Designs) was cut from a pale blue cardstock and adhered to the upper part of my card.  Such a fun card to make!!
Great summer colors!  Thanks, Holly!!

Click any of the gold links above to see the products Holly used.

Thanks for stopping by!!!  Until next time...

Pin It

Sunday, March 31, 2013

FREE SHIPPING and a Wedding Card

FREE SHIPPING
Sunday, March 31st ONLY

Lots of new items in the shop!

Click here to see them all!!

No minimum purchase required

Enter coupon code
FREESHIP-ALL
at checkout

Domestic orders only
Only one coupon code per order


Good morning, Steph here.  Sometimes I just want a card that lets the pattern papers and the sentiment take center stage.

For this wedding card, I created a 6" x 6" square card from pink cardstock and scored it with my Scor-Buddy.  You get the perfect scored lines every time you use it.


Using papers from Glitz' Pretty in Pink paper pad, I created a layered effect by using the striped paper as the base layer and adding a strip of black pattern paper  to the top and bottom edges of the rose layer.   Using some Champagne Simply Sheer Asiana ribbon, I tied it around the rose paper before adhering the rose paper to the striped base layer.

The sentiment is from JustRite Stampers Wedding Nested Sentiments and was a perfect fit inside the Spellbinders Scalloped Hearts.  I stamped the sentiment first, then arranged the heart die cut around the sentiment.   I sponged some Pumice Stone Distress Ink around the edges of the white heart, then layered it on a larger heart cut from the Glitz paper pad.


Two smaller hearts were die cut from the Spellbinders Scalloped Hearts using papers from the same Glitz paper pad.  These hearts were layered together and placed at the bottom of the white heart, both to fill in the empty space and to add some visual interest.
Thanks, Steph!  It's about time to start adding wedding cards to our stashes and this is a wonderful one to make.

Click any of the gold links above for more info.

Thanks for stopping by!!!  Until next time...


Pin It

Friday, March 29, 2013

A Butterfly


Hi Everyone. It's Jenn sharing with you today and I have a butterfly card that could be used for any occasion. 


I started with a card base of 4.25 x 5.5. To that base, I added a distressed layer of designer paper from The Lake House Collection. Next, I added a rectangle layer of designer paper matted on cardstock and then embossed with the Lovely Lattice M-Bossabilities

On my next layer, I rounded the top edges of the cardstock and then wrapped some Pink Polka Dot Trendy Tape around it in an "X" shape.  I love using trendy tape in place of ribbon. You get all the fabulous colors and patterns and the adhesive is already built in. Makes card making so easy. Once I had the tape wrapped around, I went ahead and stamped my sentiment. Then I adhered a scallop die cut border to the base of it. This border is a die-cut that comes from The Lake House paper pad.

Now, for finishing touches...using the same patterned paper and the Cheery Lynn Designs Exotic Butterfly die (small #2) I die cut a butterfly and added Pink rhinestones to the body. This, along with three Hot Pink rhinestones under the sentiment, topped it off perfectly.  


Beautiful, Jenn!!  Thanks!

Paper pads are 15% off through Thursday, April 4th!  Stock up on your favorites now!  There are also new items in the Classy Cards shop.  Details on both are here.

Click any of the gold links above for more info.

Thanks for stopping by!!!  Until next time...


Pin It

Wednesday, March 27, 2013

French Country Birthday Butterfly

Hi Classy Friends!  I just bought the new French Country 6x6 paper pad from Classy Cards 'n Such and I was itching to play with these beautiful new papers.  I created this birthday card using those papers.  


I started with a dark brown card base and adhered strips of papers from the French Country paper pad.  I stamped the sentiment (Happy Birthday stamp set from Stampavie) with dark brown ink onto the lightest colored paper.  Next, I die cut some of the rustic red paper from the French Country pad with the timeless Lady Kate Edger die (Cheery Lynn Designs) and adhered it across the middle of the card.

Using the same rustic red paper, I die cut a Labels 18 frame and adhered that on the left side over the Lady Kate edger piece.  With the same Labels 18 die set, I selected a smaller size and die cut the red gingham paper (also from the French Country pad).  I turned the red gingham piece over (it is solid rustic red on the back) and placed the Exotic Butterfly Small die (Cheery Lynn Designs) in the center and cut out the butterfly.  

To give the butterfly wings some depth, I die cut another Labels 18 (same size as the gingham piece) from dark brown cardstock and adhered it behind the gingham piece.  Then I affixed the butterfly to the center of the gingham piece, making sure that I turned it over so the red side would show.  Some dark brown pearls were affixed to the body of the butterfly.

The top right corner seemed to be a little empty, so I pulled out my corner dies from Cheery Lynn Designs and I die cut some dark brown cardstock with one of the Lace Corner Deco F dies (Cheery Lynn Designs).  I added some glue to the back of this corner piece and pressed it down into the corner.  

I love these richly colored papers in the French Country pad.  It's going to be fun to create some more cards using these papers along with stamps and dies from Classy Cards 'n Such.  :-)
Another cute card!  Thanks, Holly!!

Click on any of the gold links above to go to the products Holly used.

Thanks for stopping by!!!  Until next time...


Pin It

Monday, March 25, 2013

Happy Thoughts


Hey y'all, it's Holly posting today.  Are you ready for a pop of color??  I've created a fun "just because" card with touches of bright red to bring a smile to someone's face.


I pulled out the Summer Fresh 6x6 paper pad (Simple Stories) and cut two of the papers down to fit on a blue card base.  I die cut some red cardstock with the gorgeous new Lady Kate Edger die (Cheery Lynn Designs) and adhered it between the two patterned papers.  Next, I wrapped some red twill ribbon around the card and tied it in a knot. 

At the bottom of the Summer Fresh paper pad are some fun frames and journaling blocks, so I cut one of them out and stamped this happy sentiment from the Anytime Sentiments stamp set (Impression Obsession) with red ink.  I used some Joy Foam Pads (small) to adhere this sentiment over the ribbon.

Lastly, I pulled out the new Daisy Strip die (Cheery Lynn Designs) and cut some yellow cardstock.  I layered three of the daisy flowers together and added a red button to the center.  I glued this down to the lower left corner of my sentiment.

This is a fun and happy card to send to someone who might need a little smile to brighten up their day.  I love these colors and these gorgeous papers in this Summer Fresh paper pad.  :-)
Anyone would smile when they receive a card like this!  Thanks, Holly!

Have you joined the Classy Cards newsletter list yet?  If not, don't delay!   Newsletter subscribers get the best weekly deals!  Sign up now on the upper left side of the Classy Cards blog under the pink envelope!

Click any of the gold links above for more info and to purchase the products Holly used.

Thanks for stopping by!!!  Until next time...


Pin It