Monday, January 20, 2014

CCNS Challenge #16 - Stencils

Welcome to Classy Cards 'n Such Challenge #16. This week we are challenging you to think stencils.

Make a paper crafting project using a stencil, either brass or plastic, and of course a product sold at Classy Cards 'n Such! That's it...very simple, but please read the requirements below....looking forward to your entries!!

We have a few requirements to play:

1.  Make a classy card, tag, or other paper crafting project using at least one stencil.  
2.  Theme must be followed.
3.  The project must contain at least one item currently sold in the Classy Cards 'n Such online shop. The item used must clearly be listed in the blog or gallery post.
4.   Must be a follower of the CCNS blog either by email or reader and/or be a  CCNS newsletter subscriber.

  • If your email address is not visible on your blog or gallery, you must email it to me before the challenge closes with the number of your entry. 
  • If you aren't a follower or newsletter subscriber, sign up now!
5.   Direct link your entry post (not blog), to the InLinkz tool below.
6.   If using a gallery, such as Splitcoast Stampers, use code CCNS16.
7.   Only new entries please.  No back posting allowed.
8.   Please enter in no more then 3 challenges (including this one). Three entries per challenge are allowed.
9.   New challenges begin on Mondaysand end on Saturdays at midnight central time.  Winners are announced on Sundays.
10. CCNS has the right to remove any entries not following the guidelines and/or entries deemed inappropriate.
11. Most of all, have FUN!!!

The Prize:
1.   Due to increasing costs for international shipping, we can only ship prizes to US addresses at this time.
2.   A prize will be offered to the winner based on merit. Occasionally, a guest designer spot may be offered!
3.  A Classiest Card badge may be awarded when entries are exceptionally good.
4.  Winner must claim their prize by Wednesday of each week or the prize will be forfeited.

Enter to win this week's prize!!
Floral Heart Brass Stencil from Dreamweaver

Here are a few samples from the Classy Cards 'n Such Design Team....enjoy!!

Diane

Joy

Holly

Jennipher

Holly

We'll have full posts on each of these beautiful cards later this week! 


You're invited to Classy Cards 'n Such to see all the amazing products available.

Join the Classy Cards blog email list in the upper left column of this blog and receive exclusive weekly deals not available elsewhere! A one-time 20% discount on an order of your choice! Subsequent orders receive a 10% discount. Don't miss out, join today!


Pin It

Sunday, January 19, 2014

CCNS Challenge #15 Winner

It's time to announce the Classy Cards 'n Such Challenge #15 - Hearts and Doilies winner.


Congratulations to Tricia Traxler for entry #4!!!


You have won the 
Sophie's Heart Mini Doily
by Cheery Lynn Designs!

Winner must claim prize by 
Wednesday, January 22, 2014. 
Please send your mailing information to beverly@classycardsnsuch.com.

We would like to thank all entrants for their Classy entries.

Don't forget to check in tomorrow for the next challenge -#16 Stencils at Classy Cards 'n Such.


You're invited to Classy Cards 'n Such to see all the amazing products available.

Join the Classy Cards blog email list in the upper left column of this blog and receive exclusive weekly deals not available elsewhere! A one-time 20% discount on an order of your choice! Subsequent orders receive a 10% discount. Don't miss out, join today! 

Thanks for stopping by!!! Until next time...

   
Pin It

Saturday, January 18, 2014

Moroccan Border; LAST DAY to enter Hearts and Doilies challenge!

Hi, it's Misti again!

It's a new year and that means we are having more fun right here at Classy Cards 'n Such blog!


When I saw that the first challenge was to use a die cut for the border challenge, I knew I also wanted to make a card using a stamp as a border. Love the classy Moroccan Lattice background stamp from JustRite. I stamped it in black onto a piece of white cardstock. You don't have to use it as an entire background!

I'm trying to use up some of my scraps so that little strip of black, that looks like ribbon?  It's actually a strip of black cardstock from the Layering Swatches #2 - Deep Variety.

I stamped the rose from Old Tea Rose, by Flourishes, onto my white piece of cardstock. I water colored it using Tim Holtz Distress Markers in Barn Door and Peeled Paint, with the Tim Holtz Detailer Water Brush. I layered the colored panel onto a piece of black cardstock and then to a white cardstock base.


Your card has the perfect pop of colors! Thanks Misti!

Click any of the gold links above for more info or to purchase any of the products Misti used.

The current challenge, Hearts and Doilies, ends tonight at midnight.   You can still enter to win the Sophie's Heart Mini Doily!


Thanks for stopping by!!! Until next time...


Pin It

Friday, January 17, 2014

Velvet Glitter Card

Hi folks, it's Holly posting today!

Have you seen the new Velvet Glitters in the Classy Cards 'n Such store?  Oh my goodness, they are GORGEOUS!  I've used the Orchid Rose Velvet Microfine glitter on this card here.


I started by pulling some papers out of the Love Letters Premium 6 x 6 paper pad, just mixing and matching until they were just right.  I cut the papers and adhered them to a black cardstock layer.

For the bottom, I die cut one of the solid beige papers (from the same Love Letters pad), with the Lady Kate Edger (Cheery Lynn Designs), and adhered it below the pink paper.

I then stamped the sentiment from Hugs and Kisses Sentiments (JustRite) with black ink directly onto the pink paper.  

Now the fun started!  I adhered two strips of 1/4" wide Scor -Tape above and below the sentiment. After I removed the liner, I covered both strips of tape with the Orchid Rose Velvet Microfine glitter.  I used the glitter roll technique from Technique Junkies to make sure the glitter was well adhered and then I brushed off the excess.  The Orchid Rose Microfine glitter is a perfect match with the colors in this Love Letters paper pad.

Next, I cut the Vintage Apothecary Jar from vanilla cardstock and set it down. I then used a small heart punch from my stash and punched out several hearts from the Love Letters Premium 6 x 6 paper pad. I then adhered the hearts to the "inside" of the jar and then affixed the jar to the card with some Joy Foam Pads. I glued the entire card front down onto a vanilla card base.

This glitter is just awesome.  It's so fine and so soft, it really does feel like velvet!  I can't wait to try out the other colors!!!


Your card is so cute and pretty! Thanks Holly!

Click any of the gold links above for more info or to purchase any of the products Holly used.

Be sure to enter the Hearts and Doilies challenge!  There's still time as it doesn't close until Saturday.

Thanks for stopping by!!! Until next time...


Pin It

Wednesday, January 15, 2014

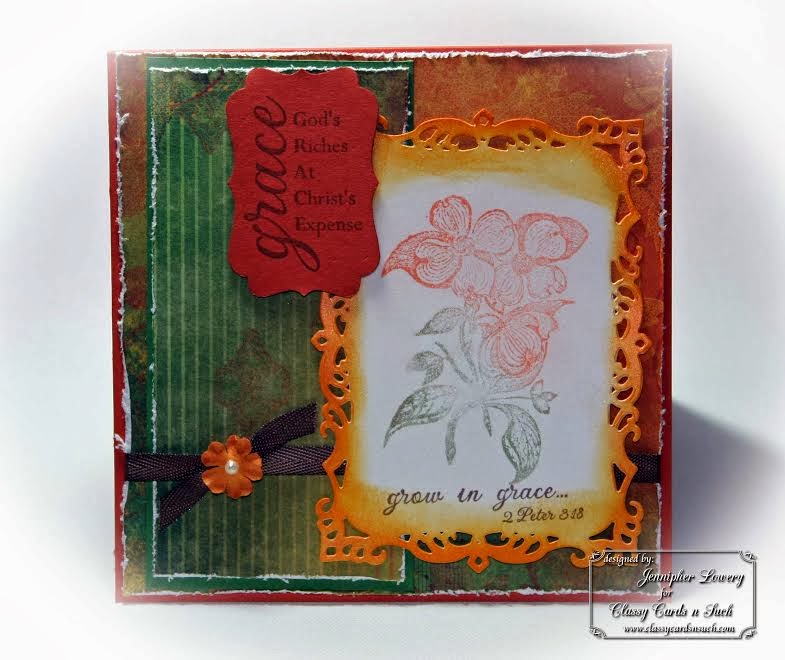
Grow In Grace

Hello everyone, it's Jenn and I'm slowly getting back into the swing of things in the paper-crafting world. Today I have a faith-based card to share with you that I designed for the Classy Cards 'n Such store. This card would be perfect for those thinking of you moments in life when you want to send a card without any special reason.


I began my card with a 5.25 x 5.25 card base. I distressed the edges of all the patterned paper used here which comes from the Autumn Song paper pad by Bo Bunny. 
My image was stamped onto white cardstock with Perfect Medium. I then colored it with Perfect Pearls.

Next, the image was die-cut using Spellbinders Decorative Labels Eight. I also distressed the edges of the die cut using Tim Holtz Distress Inks and Perfect Pearls.


I added a ribbon and a tiny Prima Petal for finishing touches. The pearl dot in the center of the flower was created with the Viva Decor Pearl Pen - Ice White.


Welcome back! Love the card! Thanks Jenn!

Click any of the gold links above for more info or to purchase any of the products Jenn used.

Check out all the new products added to the store here. There are many items added to the Clearance section with NEW PRICE REDUCTIONS, so be sure to grab them before they are gone!

Join the Classy Cards email list and get the one-time 20% off coupon code AW20off (no spaces), you may do so at any time. Use AW10 any time to get 10% off your entire order!!
Only one coupon code per order please.

Thanks for stopping by!!! Until next time...

  
Pin It

Tuesday, January 14, 2014

Hearts and Cones

Hello Classy Friends, Diane here with you today!  I hope you all are staying warm and cozy in your part of the world!

My card today was made for the challenge this week at Classy Cards 'n Such, which is Challenge #15, Hearts and Doilies.


After the Christmas Holidays, the first thing that comes to my mind is Valentines Day. It is a favorite of mine, not sure why, maybe it is just the pretty hearts and an excuse to eat a box of chocolates!

To start my card, I used white cardstock for the base, and  embossed it with the Darice Doily Lace embossing folder.

I not only have a love for hearts, but doilies as well. I am once again using my favorite Cheery Lynn Designs French Pastry Doily Die. I cut the doily out of a metallic paper called Stardream Jupiter, that has a beautiful subtle sheen to it. This 110 lb. paper is fabulous! With each order, I purchase a few packs, as the colors are gorgeous!

 
The Valentine cones were made with two small doily dies that come in the center of the Cheery Lynn Designs die Polynesian Sails Oval. I simply rolled and glued them to make my cones.

The cute little flower heads were made by using the center fringe piece from the  Cheery Lynn Designs die Black Eyed Susan Strip.  Aren't they cute? They take only minutes to make! I glued the flower heads to the Cheery Lynn Designs Flourish Leaf Strip.

I added a few heart stick pins to complete my card.

Other products used in the making of my card are:

Cuttlehug, large - I highly recommend this to get a full, clean cut for the more intricate dies.

Thank you for visiting with me today!


Your card is so cute and full of dimension! Thanks Diane!

Click any of the gold links above for more info or to purchase any of the products Diane used.

Thanks for stopping by!!! Until next time...

   
Pin It

Monday, January 13, 2014

Friends and Family

Hi everyone, it's Joy!

Today Classy Cards 'n Such has a wonderful challenge, especially for this time of the year!  Beverly, the owner of Classy Cards 'n Such would like to see what you would do with doilies and hearts.  Here is a card I made.


Here's how quick the card went together:

1. Cut white doily from the Quinn Flourish from Memory Box.

2. Cut small heart from Spellbinders Classic Scalloped Hearts.

3. Punch out a Friends/Family die cut from Lady Rose 6.5" x 6.5" paper pad from Kaisercraft.

4. Stamp sentiment and tiny flourish from the JustRite Hugs and Kisses Sentiments stamp set on another die cut punched out from the Lady Rose 6.5" x 6.5" paper pad.

5.Layer these elements and pop up with Joy! Foam Pads on layered Lady Rose 6.5" x 6.5" paper pad papers.

This was a quick and easy card because the Lady Rose paper pad has 4 pages of die cuts and the papers coordinate so well.  The small scallop heart and the Quinn Flourish were cut out in one pass of my Vagabond.
Check out the projects the other Design Team member made by clicking here.  Play along with us and enter in the challenge! You could win a prize!


What a great card for those you love! Thanks Joy!

Click any of the gold links above for more info or to purchase any of the products Joy used.
Join the Classy Cards blog email list in the upper left column of this blog and receive exclusive weekly deals not available elsewhere! A one-time 20% discount on an order of your choice! Subsequent orders receive a 10% discount. Don't miss out, join today!
Thanks for stopping by!!! Until next time...
    
Pin It