Thursday, July 19, 2012

Do Not Be Afraid

Hello Everyone! It's Jennipher joining you today with a 6x6 easel card. This is my first time ever making an easel card and I really enjoyed the process and was happy with the finished project. I hope you like it!


Let me tell you about the process...


To make a 6x6 easel card, I needed to start with a 6x12 cardstock base. I then scored it at 6" and then again at 3". I folded my scored areas and then added a 6x6 cardstock front. Once I had the card made, it was time to decorate it!


I began with a sheet of Damask designer paper from the Glitz Designs Vintage Blue collection. I left it at 6x6 and distressed the edges with a distressing tool and then inked them with Faded Jeans Distress Ink from Tim Holtz. For my next layer I used a sheet of yellow designer paper from the same collection. This particular sheet already has a distressed pattern on it that looks sort of like paint or ink splotches. I mounted it on matching cardstock and then I used the embedded embossing technique on it by running it through my Cuttlebug with the polka dot embossing folder. The next layer was the striped and floral paper. The edges were distressed and inked and then mounted onto a navy blue cardstock base. Before securing to my card, I added a seam binding ribbon.


I used the Fanciful Flourish Die from Cheery Lynn Designs with a piece of Reich Shine Champagne cardstock to create my flourish. It was added on top of all the previous layers a little off center.


Now it was time to add my Scripture which was going to be the focal point of my card. I used the Lacey Circle Die from Spellbinders and cut out a vanilla circle. While the circle was still in the die, I sponged distress ink in the opening. Then I stamped my Scripture in black ink.


I wanted to add a flower to my card front but didn't have one that matched. So, I took a Ceylon White Wedding flower from Prima and blotted it on my distress ink pad. It added just the right amount of blue and the blotted look fit in with the rest of the distressing. For the final touch to the front of my card, I added a row of Royal Blue Rhinestones from Want2Scrap.


Now it was time to add decoration to the inside of my card. I used the same Damask designer paper as the base. For your easel card to stand up properly, you have to add something about 1/3 of the way into the inside of the card. I used a piece of the floral stripe designer paper and punched a lacey border in it. Before adhering it to the card, I took a piece of yellow cardstock and punched the same lacy border in it and then staggered the floral stripe paper on top of it. I used foam pads to adhere it to my card so that it would be popped up and would keep my easel from collapsing when it was open.


Now it was time for my sentiment and finishing touches. I used the smaller lacey circle die and again sponged the inside with distress ink before stamping my sentiment in black ink. I added a few foam pads to this and secured it to the base. To pull it all together, I added another row of Royal Blue Rhinestones.


This card was made for someone very special to me who is about to embark on a journey and is going to need daily encouragement. I thought what could be more encouraging than knowing that our Lord is with us wherever we go! No matter what we may face each day God is right there with us and there is no need to get discouraged or be afraid. I don't know about you but, this certainly makes it easier for me to get up every morning and face the day!


Supplies:
Glitz Designs Vintage Blue Collection
Faded Jeans Distress Ink
Royal Blue Rhinestones
Spellbinders Lacey Circles
Cheery Lynn Designs Fanciful Flourish
Reich Shine Champagne Cardstock
Ceylon White Wedding Flower from Prima
Chalk White Seam Binding


Beautiful card, Jenn!!  Thanks for sharing!!!


We've received several beautiful entries in our HANDMADE FLOWERS Challenge!   Won't you join the fun??  Please be sure to read the guidelines carefully so that you can be considered for the $10 Gift Certificate to the Classy Cards shop!  All of the details are here!


There are gorgeous NEW Joy! Crafts Die cuts - card stands and corners - in the Classy Cards shop!   Be sure to check those out here!


Thanks for stopping by!!!  Until next time...


Pin It

Wednesday, July 18, 2012

White on White


Howdy, it's Holly posting today.  Have you played in the Handmade Flowers challenge here on the Classy Cards 'n Such blog?  This is a fun and easy challenge.  If you have any flower punches or floral dies, pull them out and show us what you create with them.


I went completely white for my card today.  Everything is white except for the sentiment.  The card base and all the die cuts as well as the brads are white.  This makes for a fun change of pace, doesn't it?  The trick with creating all-white cards is you need to have lots of texture to break up all the white-ness.  You can see plenty of texture here with the shaped flowers, the leaves, the intricate oval die and the rounded brads.

I started by stamping my sentiment directly onto the white card base, and then I adhered the Polynesian Sails Oval around the sentiment.  I die cut some tropical leaves and glued those down on the oval, then I die cut some Olive Branches and glued those down on each side.  I die cut a bunch of flower pieces from the Build a Flower #1 set as well as from the Sweet William set.  It was fun to just play around with the various flower pieces and I mixed and matched them until I got a flower I liked.  I used my fingers to pinch some flower petals and fluff up the stamens.  I used white brads to put each flower together, and then I glued them down over the leaves on the oval die cut.


I've used these products from Classy Cards 'n Such to create this card:
Polynesian Sails Oval die (Cheery Lynn Designs)
Tropical Leaves dies (Cheery Lynn Designs)
Olive Branches dies (Cheery Lynn Designs)
Sweet William flower dies (Cheery Lynn Designs)
Build a Flower #1 die set (Cheery Lynn Designs)


I hope you have a wonderful day!
Be sure to upload your projects with beautiful handmade flowers to our challenge! 


Follow the gold links above to see each product.


Thanks for stopping by!!!  Until next time...


Pin It

Tuesday, July 17, 2012

Pia with Roses

Before I share my card with you, I have exciting news!   Classy Cards has a brand new newsletter format!  Both of our other newsletters - Yahoo and the website newsletter -  are gone, so please be sure to sign up for the new one under the pink envelope and pencil on the left side of the blog!
Cheery Lynn's July Christmas release is available for PRE-ORDER and has been shipped!   Click here to see all of the Cheery Lynn Christmas designs.


Classy Cards now carries Memory Box dies and there are several new Impression Obsession stamps in the shop and a couple of dies, too!   More info on our Weekly Deals page here!
Some friends and I get together once a month to swap cards, learn a technique and share a challenge card.  When we met in June, our challenge hostess gave us each a small package with Pia stamped on white cardstock, some beautiful lavender cardstock, a length of really pretty multi-colored ribbon, a shorter length of lace with cute little bows, and four green pearls.  We could add anything to our card, but we had to use everything in the package.


I cut my card base from Pearlized Esse White Metallic.  I colored Pia with Copics and cut the image with an oval die.   I sponged a little Old Paper ink around the edges of the oval while it was still in the die.  I cut a Swedish Spring Oval out of the lavender cardstock for the second layer.   I used Rose Quartz for the Small French Lattice which I layered on lavender cardstock.


I wove the multi-colored ribbon and lace with bows through the bottom of the French Lattice before I adhered it.   


I used the Miniature Rose die for the lavender flowers at Pia's feet and Olive Branches for foliage from Emerald cardstock.

I cut the miniature roses from the lavender cardstock and used four for each blossom.   On each one, I used one of the styluses from the McGill Paper Blossoms Paper Tool Kit to soften the fibers in the cardstock.   Be sure to mold the flowers where the right side will show on each bloom.  I bent the innermost layer tightly inward with my fingers and then applied a touch of clear-drying glue to each petal so they would remain in a tight bud.   I then layered the other petals, leaving each a little more loose than the last and glued them together in the center.   I found that using my Tweezer Bee made handling of these small flowers much easier!  I placed them on top of the Olive Branches to complete my bouquet.   The final touch was adding the green pearls.


I hope you have enjoyed my little Pia!   She was fun to make and will go to someone special!!


Click on the gold links above for more info.  


Thanks for stopping by!!!  Until next time...


Pin It

Friday, July 13, 2012

CCNS Challenge #12 - HANDMADE FLOWERS!!!

This challenge is all about handmade flowers.  Handmade flowers add a unique and personal touch to our cards!   You may use die cuts, stamped images that are cut out and layered, or ribbon fashioned into a flower.   If I've left a technique out, feel free to share with us by linking your card or project below.

Many of the recent challenge entries have not followed the guidelines below and consequently, could not even be considered for our challenge prize.   Please read our rules carefully before you submit.   We want everyone to play, but please follow the guidelines below.  Thanks!   

Here's how to play:
  1. Make a classy card, tag or other paper crafting project using handmade flowers (see above).
  2. The card must contain at least one item currently sold in the Classy Cards 'n Such shop.  
  3. The Classy Cards 'n Such item(s) must clearly be listed in the blog or gallery post with the entry.
  4. Post your card or other paper crafting project to your blog or gallery such as SplitCoastStampers.  
  5. Blog/gallery posts with challenge entries must have a direct link back to the Classy Cards 'n Such challenge post.   All gallery posts should include keyword CCNS12 and include a direct link to the Classy Cards 'n Such challenge post if allowed by the gallery.
  6. Upload your project using the InLinkz tool at the bottom of this post and link directly to your blog post or gallery post - not just to your blog or gallery in general.
  7. Entries must be linked to this post by Thursday,
    July 26th at 7AM Central time.
  8. Enter as often as you like as long as the above rules are followed.
The winner will receive a $10 Gift Certificate to the Classy Cards 'n Such online shop!   In addition, we may choose one or two entries to receive the Classiest Card Award!


Linda and Holly have some examples to share!


Linda
Holly
Over the next few days, I'll post details showing how each card was made.  Subscribe to the Classy Cards blog either via email or with Google Friend Connect to get regular updates!  Both links are on the left sidebar of this blog.

Play along with us by entering your creation with HANDMADE FLOWERS using the InLinkz tool below!   The winner will receive a $10 Gift Certificate for the Classy Cards shop!

Thanks for stopping by!!!  Until next time...


Pin It

Thursday, July 12, 2012

Winner Challenge #11


Congratulations to Barbara Washington, entry #3 AND to Judy1223, entry #4!!!  You are both winners of a $10 Gift Certificate for the Classy Cards shop!!!   I just couldn't decide, so why not pick TWO winners???   Barbara and Judy, please contact me no later than Monday, July 16th, 5PM Central time for instructions about collecting your gift.


Judy's Sunflowers


Please be sure to stop back by tomorrow when our next challenge will be posted.  We would love to have you play along!!

Thanks for stopping by!!!  Until next time...


Pin It

Monday, July 9, 2012

Holly Wins Again!!!

Congratulations to Holly Brown, one of our wonderful design team members!!!   Her Christmas in July card, which was posted here on this blog, has won the Cheery Lynn Designs challenge!!!   You can see the Cheery Lynn announcement here!


You go girl!!!


Pin It

Sunday, July 8, 2012

Tulips and Floral Ovals

Hello, everyone!  It's Linda, posting my card for our new Classy Cards 'n Such Challenge #11 - Outline Stickers.  If you haven't tried using these beautiful stickers on your cards, you really should!  They are so easy to use and they can either be used as a great focal point or for added embellishment on your card.  They can also be colored with any of the usual coloring mediums.  I particularly like to color them with glitter.  It's so easy and makes a beautiful card.

For my card today, I used the Tulips Outline Sticker as my focal point.  I placed it on the Spellbinders Floral Ovals die which was cut from Pearlized Esse White Metallic paper.   I would remind you to be sure and place a layer of wax paper between the die and the cardstock when cutting out this die.  I failed to use it on the first die I cut and ended up having to throw that one away because it was such a mess when I finally got it out of the die!   With the wax paper, the second one came out of the die really easily. 


I used the Quickie Glue Pen to lay down the glue to hold my glitter.  I used Sparkle N Sprinkle Lemonade glitter for the flowers and Meadow Spark glitter for the stems and leaves.   I cut the largest Floral Ovals out of a yellow paper I had in my stash and used this as the background  for my smaller diecut.  


The base of my card was cut from the  Butterflies embossed paper.  This is one of my favorite papers and believe me the pictures just do not do it justice.  The embossing on this paper is very dainty and just beautiful!  For embellishment, I added the Small Butterfly adorned with some Want2Scrap pearls.  Down the center of the card, I placed some white and yellow ribbon to add some interest.  In the corners of the card, I placed some gold Outline Sticker Corners just to add a little more embellishment.


I hope you have enjoyed my card and that you'll play along with our Challenge and send us your own creations using Outline Stickers.  If you've never used them, now is your chance to order some from the Classy Cards 'n Such shop and try them out for yourself.  I really think you'll like them!

Thanks, Linda!!  This card is sooo pretty!!


We've used lots of outline stickers on the Classy Cards blog.  If you would like to see more, click here.


I've added a new feature to the Classy Cards shop.  You can now see cards or other projects using Classy Cards products!  Whenever you need a little inspiration for a particular product, try this:

  • Click on the picture of each item.  
  • Then click on Alternate views below the product pictures.     
  • Click on the Alternate view of choice to enlarge each one.

This is a work in progress, so not every item has pictures yet.  Click here for examples using Small Butterflies!

Glitter and embossing powders are on sale this week - 15% off when you enter coupon code GL-EP (all caps, no spaces) at checkout!  See all of the weekly deals here.

Click any of the gold links above for more info.

Thanks for stopping by!!!  Until next time...


Pin It

Friday, July 6, 2012

Antique Glimmers Birthday


It's Holly here today, and I'm sharing this lacy and romantic birthday card with you.  The cards that I make the most are birthday cards and Christmas cards, and I love having birthday cards on hand when those special days pop up.
 
I started with an Antique Glimmers technique from Technique Junkies for my background.  The patterned paper on the left side matches my background piece beautifully, so I used that as inspiration for coloring the fancy image from the Shabby Chic Labels 4 stamp set with Copic markers.  I used a Stardust Clear Glitter Pen on the fancy vines for a sweet shimmery touch.  You can see the glitter in the close-up picture.  This fancy image was cut out with a Labels 4 Spellbinders die.  I stamped the "Birthday Wishes" from the Birthday Sentiment Set and cut it out with a circle die, and then I matted it with its matching scallop circle.  I used foam dots to adhere the sentiment to the center of the fancy label image.
 
Did you see the gorgeous lace in the store?  This Ecru Delight lace is beautiful!  I used two strips of it on the left side of my card and then adhered a small piece of brown cardstock in the center of the two pieces of lace.  A row of pearls really sets off the beauty of the lace.  


Here are the products from Classy Cards 'n Such that I have used on my card:


Such an elegant card!  Thanks, Holly!

 Glitter and embossing powders are on sale this week!  Save 15% when you use coupon code GL-EP (all caps, no spaces) at checkout!  There are several new items in the shop this week.   All of the details on sales and new items are here.  

Be sure to enter our OUTLINE STICKER Challenge!   Details are here.

Click on the gold links above for more info.

Thanks for stopping by!!!  Until next time...


Pin It

Wednesday, July 4, 2012

Christmas in July!


Hi folks!  It's Holly posting today, and I thought I'd get started on some Christmas cards.  :-)
For this card, I went with a wintery Christmas lights scene.  I started out by sponging some Stormy Sky distress ink on white cardstock, and then I sponged some Chipped Sapphire distress ink around the edges.  The falling snow is created by using a white gel pen and just adding dots here and there.  You could also use the White Picket Fence distress ink marker to create the dots of snow.
I cut out some snow drifts with my scissors and sponged the very top edges with Chipped Sapphire distress ink.  I adhered the larger snow drift to the falling snow background, then added a Victorian Picket Fence over that.  The Christmas Lights Swag was die cut from black cardstock and red cardstock and added to the fence.  I wanted a little bit of greenery, so I die cut some Holly Lace Flourishes, snipped the leaves, and glued the leaves down on the fence.  I added some Red Rhinestones to the cluster of holly leaves in the center of the fence.  To give my fence the look of real snow falling on it, I used the Distress Fuzz technique from Technique Junkies and added pieces here and there.  A smaller snow drift was glued over the base of the fence and I used some word stickers at the bottom for a Christmas sentiment. 


Have you started on your Christmas cards yet?  Pick up some of these dies and have fun creating your own winter and Christmas scenes!  


Cheery Lynn is having a "small" Christmas release in mid-July, so stay tuned!   I haven't seen the new dies yet either but I'll keep you posted!!

Meanwhile, it's a great time to enter our Outline Sticker Challenge and take advantage of this week's sale!!

Clicking on any of the gold links above will take you to more info.

Thanks for stopping by!!!  Until next time...


Pin It

Tuesday, July 3, 2012

Jack and Ginger

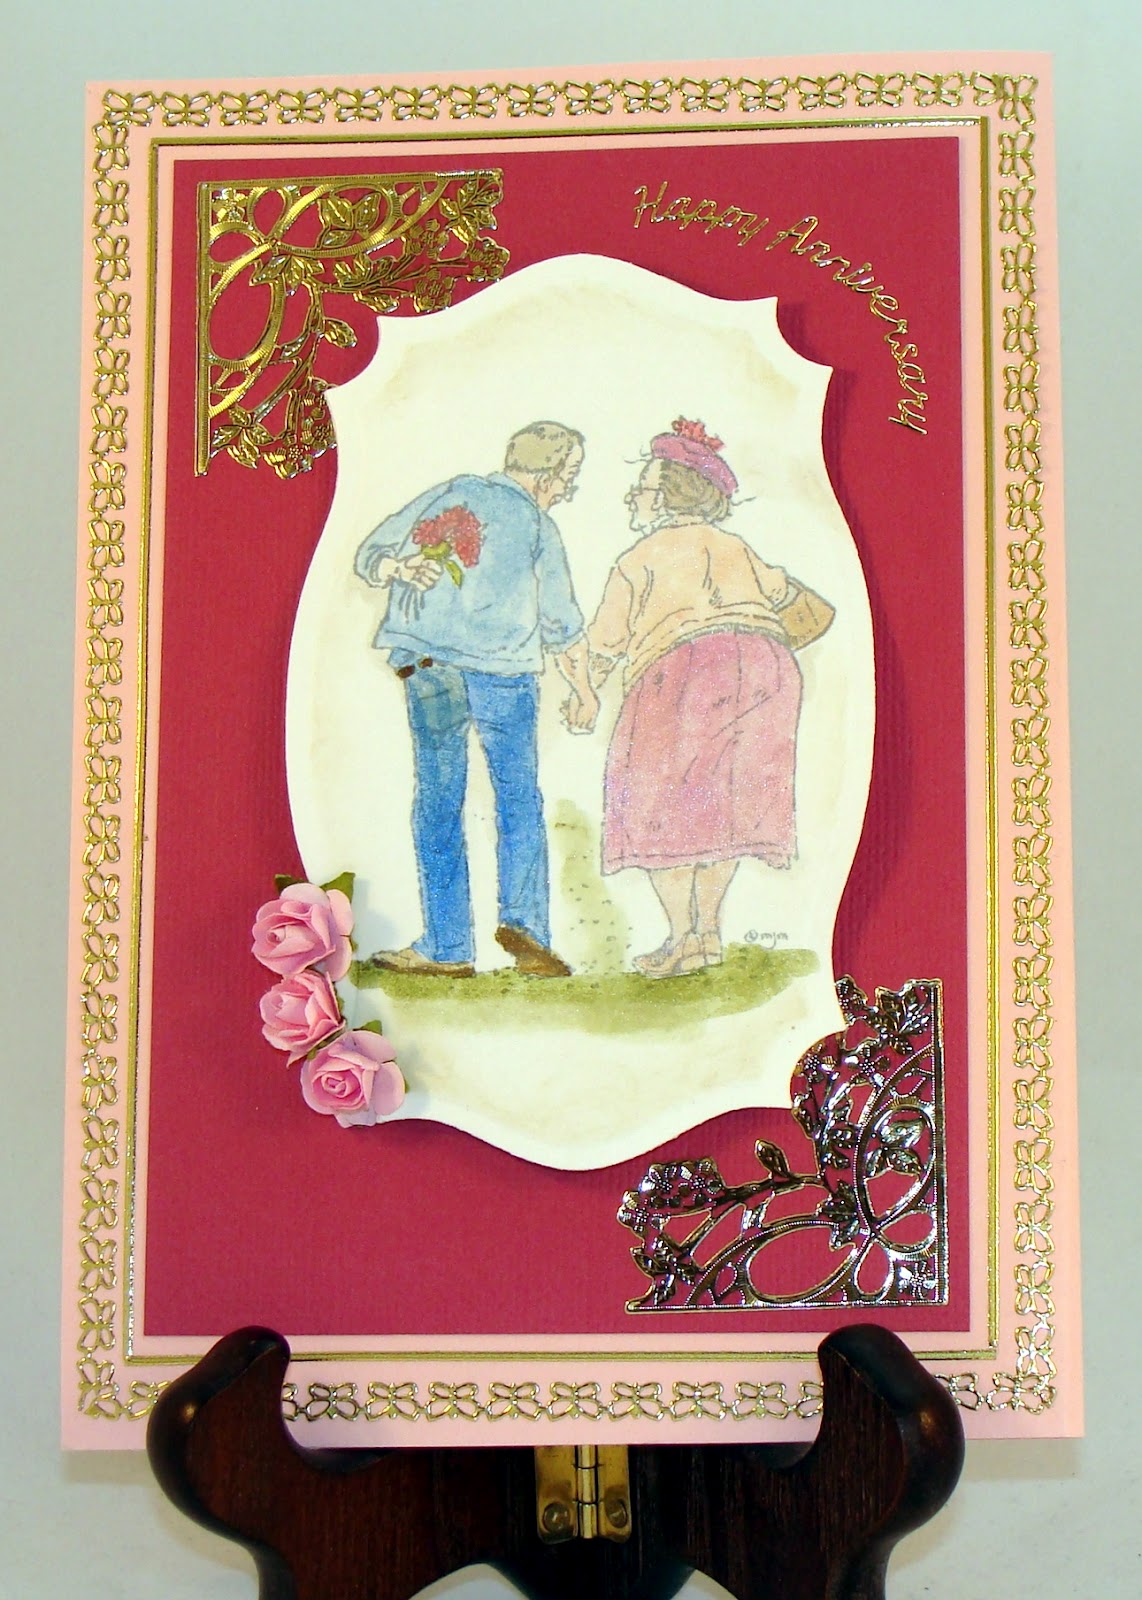
Hi Classy Friends!  I want to share with you the card I made for our current outline sticker challenge!  Outline stickers are one of my favorites to use on cards, especially when I need something quick and easy.   However, you can also dress them up as much as you like!   Elegant either way!!  I think that Jack and Ginger make an adorable anniversary card, especially if the couple is a bit older.   This card was made for my aunt and uncle.


I started with a pink card base.  I stamped Jack and Ginger on white cardstock and colored with Twinkling H20s.  I cut them out with Labels Eighteen and sponged the edges with Old Paper while the stamped image was still in the die.  If you don't have the Old Paper ink pad, it's easy enough to smear some ink from the Old Paper marker onto a non-stick craft sheet or glass mat and pick the ink up with a sponge and then apply to your project.


Although the mat appears to be red in the photo, it is actually a deep rose color from my stash.   I adhered the Corner Border Flower in Transparent Gold to opposite corners.   I framed the mat with Lines (gold) with an outer frame of Butterfly borders.  I love the look that outline sticker borders add to a card, whether it has other outline stickers or not. 


I added the Happy Anniversary sentiment from the Multi Sayings gold sheet.  The final touch was adding a little bouquet of the new Pink Mini Rose Buds.


If you've never tried outline stickers, I think you will be pleasantly surprised!  Check them out and be sure to enter our Outline Sticker Challenge here!   It's fun and easy!!


The Distress Ink Marker SALE ends at midnight, July 4th!   They are only $99.99 (regular price $114.99), so take advantage of a great deal NOW!!  No promo code needed.


And...all of our stamps are 15% off through Friday!  Click here for all of the details on this wonderful buy!


Happy 4th of July!!!


Thanks for stopping by!!!  Until next time...


Pin It

Sunday, July 1, 2012

A Sunflower Birthday!!!


Hi again!  It's me, Holly, posting today, and I'm sharing this warm sunflower card that I created for the latest challenge on this Classy Cards 'n Such blog.  Have you played in this challenge yet?  This is probably the easiest challenge ever!  Simply use an outline sticker and share it with us for a chance to win a gift certificate to go shopping!
 
Outline stickers are quick and easy ways to embellish your cards and projects.  Simply peel the sticker, affix it to your cardstock, color it in if desired, and ta da!  Done!
 
For my card, I peeled three of the Sunflowers (Gold) stickers and affixed them to white cardstock.  I colored them with Distress Ink Markers and set them aside while I created my card base.  (You can also buy the markers individually.  The marker colors I used are - Wild Honey, Rusty Hinge, Peeled Paint, Forest Moss, and Vintage Photo.)  I created a warm honey and rust colored background by using the Water Color Distress technique from Technique Junkies and adhered that to my dark brown card base.  A strip of dark brown cardstock was adhered to the middle of my card and I stamped the birthday sentiment (from the Birthday stamp set) at the bottom of the honey paper with dark brown ink.  I cut out each of the three colored sunflower stickers with an oval die and adhered each one to the dark brown cardstock strip.
 
This card will be perfect for sending to someone in the mail.  It's nice and flat so it only needs one first class stamp, and the sunflowers will make the birthday girl smile when she sees this card!  


 Such a cute card, Holly!   Be sure to enter our current challenge here!   Outline stickers are so easy and fun to work with!!

Clicking on the gold links will take you to more info.

Thanks for stopping by!!!  Until next time...


Pin It