Thursday, May 29, 2014

Happy Birthday To You

Good Morning! Joy here today posting for Classy Cards 'n Such.  Beverly, owner of Classy Cards 'n Such gave us an opportunity with this challenge to make a Happy Birthday card.


1.  Cut a mat in aqua paper using Matting Basics A by Spellbinders.
2.  Cut the next size mat from white card stock using the Matting Basics A by Spellbinders.
3.  Cut a circle using the negative part of the circle as a mask place this mask on top of the white card stock.
4.  Place Garden Flora stencil on top of the mask and sponge three different colors of Tim Holtz Distress Inks with a Mini Ink Blending Tool. 
5.  Remove the stencil and mask and you will have the circle of Garden Flora.
6.  Cut the Happy Birthday sentiment using the Happy Birthday Extravaganza sentiment by Memory box and cut loose the Happy and place on top of a small strip from Vintage Bliss paper pad by Simple Stories.
7.  Stamp just the Birthday from the Happy Birthday sentiment from Spring Words, by JustRite, below the strip, adding 3 small brads.
8.  Layer on top of a card blank.

It's a great feeling knowing I can add this to my card supply and pull it out just when I need it.

Thanks for looking at my card and have a HAPPY stamping day!

Great card, everything just pops with color! Thanks Joy!

Click any of the gold links above for more info or to purchase any of the products used. If you like Joy's card, please share it on Facebook, Pinterest, Google+, Instagram...anywhere your crafty friends can be found!

The icons below my signature make it easy to share!

Thanks for stopping by!!! Until next time...
Pin It

Wednesday, May 28, 2014

Pinwheel Birthday

Hi folks, it's Holly posting today!

Have you played in the Happy Birthday challenge here this week?  It's a really easy challenge. Just make a birthday card for anyone and share it with us.  I created this card to give to my mother on her birthday - I hope she likes it!


I started by stamping the pinwheel from Flourishes Pinwheels and Popsicles onto three small pieces of white cardstock.  I also stamped the pinwheel onto three different colors of papers from the Vintage Bliss 6"x 6" paper pad, and then I cut these pinwheels out.  After I colored the sticks with a gray Copic marker, I paper pieced the colored pinwheels onto the white papers.

Next, I cut the rainbow striped paper from the Vintage Bliss 6"x 6" paper pad and adhered it to a gray card base. I added a small strip of gray cardstock across the background and then adhered my three pinwheels to the card with some Large Joy! Foam Pads. I added three of the Mother of Pearl Rhinestones,and affixed to the centers of each pinwheel.

For the ribbon, I pulled out some Tim Holtz Distress Stains - Peacock Feathers, Brushed Pewter, and Weathered Wood.  I smooshed some of each color onto my nonstick craft mat, spritzed it with water, and then smooshed some Chalk White Seam Binding into the ink.  I crumpled it up into my hand and then set it aside to dry. Once it was dry, I wrapped it around the card and tied it into a bow.

The last thing I did was stamp the sentiment, also from the Pinwheels and Popsicles stamp set. I cut it out with a circle die, matted it to a gray scallop circle, and adhered it to the card right over the ribbon.

What a great birthday card for your mom!  Thanks Holly!

Click any of the gold links above for more info or to purchase any of the products used.If you like Holly's card, please share it on Facebook, Pinterest, Google+, Instagram...anywhere your crafty friends can be found!

The icons below my signature make it easy to share.

Thanks for stopping by!!! Until next time...


Pin It

Tuesday, May 27, 2014

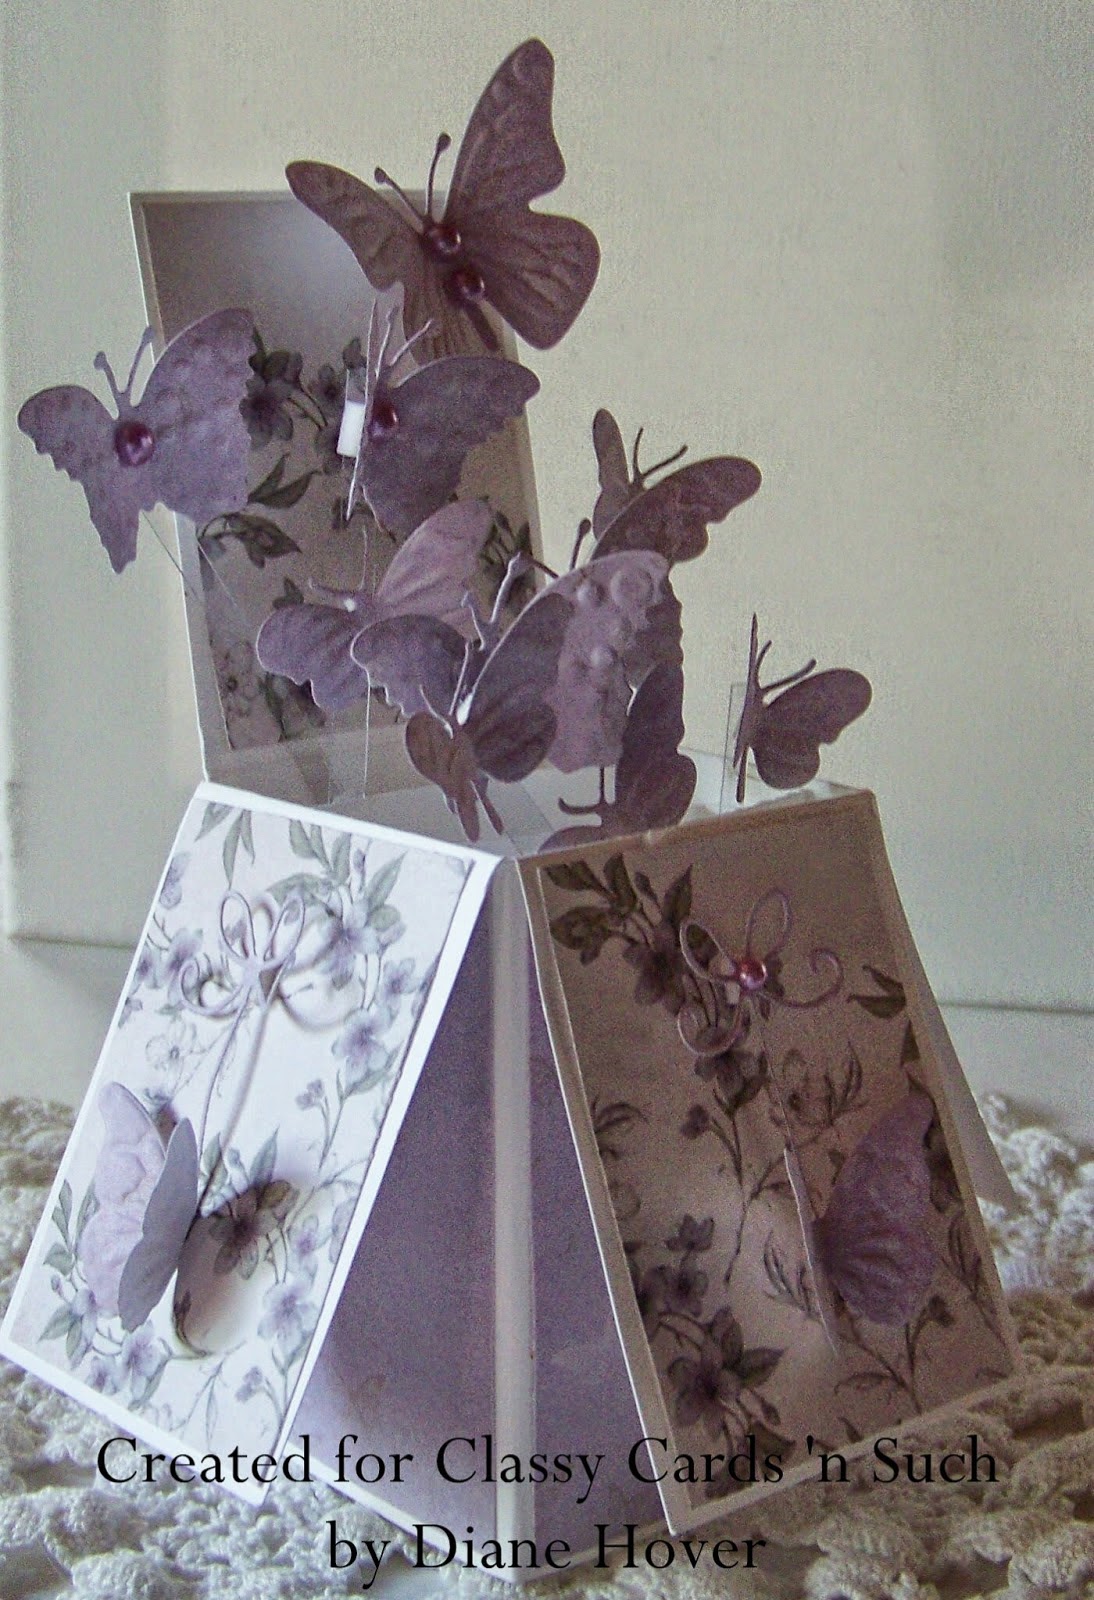
Birthday Butterflies

Hello Classy friends, Diane here with you today!

This week our classy Cards 'n Such challenge is Happy Birthday. What could be any easier then that? I hope you will join us!

 
For my card today, I wanted to step out of the normal A2 card zone,and create something a bit different! I am sure you all have seen the "Card In A Box" cards that have been popping up all over. I love the look of these cards and after receiving my new Papermania Bellisima A5 Paper Pack papers, I knew I wanted to do one of these cards! The papers are very soft, pastel colors...so pretty!


Other than the base card stock, all my panels and the butterflies were cut from the Bellisima A5 Paper Pack papers.

 (back of card to sign)

The dies used for the front panels of the card are the Memory Box Precious Butterflies. The butterflies flying out of the box are from the  Butterfly Trio by Joy Crafts.

For a bit of bling, I added a few Lavender Pearls to some of the butterflies.

If you are wondering how I got my butterflies to float, I cut a few acrylic strips from the packaging some of our products come in, that you would normally throw away.
One of the unique things about this card, is it folds flat for mailing.
A few other products used in the making of my card are:


I hope you have enjoyed today's post. We would love to see your entry for our challenge!


Your Card in a Box is gorgeous! Thanks Diane!

Click any of the gold links above for more info or to purchase any of the products used. If you like Diane's card, please share it on Facebook, Pinterest, Google+, Instagram...anywhere your crafty friends can be found!

The icons below my signature make it easy to share.

Thanks for stopping by!!! Until next time...

  
Pin It