Showing posts with label Twinkling H2Os. Show all posts

Monday, February 8, 2016

Pretty Flowers

Hi, Diane with you today. This week's challenge is Lilacs and Lace.

I started with a gorgeous new embossing folder from We R Memory Keep Next Level - Quilted.


Next, a lacy heart was die cut using two of the dies from Spellbinders Lace Hearts. 

Flowers were cut using Memory Box Blushing Bouquet.  The flowers were painted with a Tim Holtz Water Brush and using colors from Twinkling H2Os Holiday Sparkle and 
Autumn Brillance.  It gives them a watercolor effect, but they are actually a bit shimmery from the H2Os.

To finish, I simply added a bow!  Thank you for visiting with me today!


Be sure to get in on this week's challenge!   All of the details are here.

Thanks for stopping by!!!  Until next time...


Pin It

Thursday, January 7, 2016

Snow and Winterberries

I think one of the prettiest winter images is fallen snow - especially  on tree branches.  Even more amazing is how they can clump on the tiniest of things like the little red berries.  I tried to recreate that here with some things from the Classy Cards 'n Such store.  

I wanted my card to be shimmery white and red so I started with a white card base and added the Our Daily Bread Designs Vintage Flourish Pattern in Shimmering White. The Poppystamps Holiday Winterberries was cut out of water color paper twice and colored with the red and green colors from the Twinkling H2O's Thankful set. After I adhered the two branches of the winterberries using Art Institute glue to a popped up frame, I added "snow" with the Ice White Viva Decor Pearl Pen and some sparkling Stickles. The verse from ODBD Faith is stamped in black and then clear embossed.


Thank you so much for looking!

We've made it easy for you to find our future challenges!  Click  on the Challenge Calendar tab on the right side of the blog. All of the challenges are listed through February 2016!

Thanks for stopping by!!! Until next time...


Pin It

Thursday, October 29, 2015

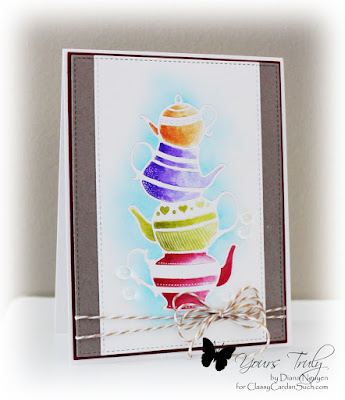
How About Some Tea?

Hello, it is Diana today! Are you feeling the chill in your area yet?  It almost feels like we skip Fall altogether in the mornings here.

I've been drinking tea all day trying to warm myself from the inside out. So it was the perfect time to use this Poppystamps Teapot Stack die again!

Diana Nguyen, poppystamps, teapot stack, watercolor 

This time I combined sponging and painting. I first die-cut the stack of teapots and removed all the dies and the little pieces. I then sponged around the negative space for a soft blue glow with some Broken China.

I then watercolored the different pots with some colors from the Twinkling H2O's Thankful set.

I then used the in-laid die-cutting technique. I trimmed down my panel with the stitched die from MFT Blueprints 13. I first cut out the left side, and then lined it up again to make a skinnier rectangle from the right.

The Kraft layer is the whole MFT die without any trimming.

Finally, thin matting with red card stock using Spellbinders A2 Matting Basics A.

It was a little flat so I added a twine bow before adhering all my layers to a white card base and some details with a white gel pen. 

Stay warm (and healthy)! 


Don't forget to check out the NEW section at Classy Cards 'n Such. Release from 2015 collections and other goodies are being added every day! When you check out, don't forget to enter your discount for a great savings! 

Thanks for stopping by!!! Until next time...


Pin It

Monday, October 19, 2015

Pink Poinsettias

Hello!  Diana here sharing a Christmas card I made, with some non-traditional colors for this week's pink Christmas challenge at CCNS. Pink is not a color you would normally see me decorate with a household of all boys, but I can use it to my heart's content on my cards. Yay for crafting!


I started with a stitched background using MFT Blueprints 13. I then added a very light wash of the green from the Twinkling H2O's Thankful set. It's a nice soft muted yellow green once it's diluted quite a bit.

I then added a poinsettia spray using Impression Obsession Pine Branch and PoppyStamps Small Blooming Poinsettia. I sponged the edges of the poinsettia cut out of pink card stock, with a darker pink distress stain Picked Raspberry.  I Then added some white Impression Obsession Small Snowflake Set with Art Institute Dries Clear Adhesive.

Finally, I added a little Christmas sentiment using ODBD God's Timing and Stitched Ovals dies popped up with Joy! Small Foam Pads.

Thank you so much for looking!


Don't forget to check out the NEW section at Classy Cards 'n Such. Release from 2015 collections are being added every day! When you check out, don't forget to enter your discount for a great savings!

Thanks for stopping by!!! Until next time...


Pin It

Thursday, September 10, 2015

You Are Beautiful

Hello, it's Diana again with a combination of my favorites: watercolors and butterflies. This card came together very quickly - after I had messed up a couple of previous attempts. I just made it too difficult! To make the easier (and prettier) version, read on!

I started with a sheet of watercolor paper, trimmed down with the large stitched die from MFT Blueprints 13. Apparently I am trying to see how long this particular die will last - if you've noticed how often I start my cards with this particular step! It still works beautifully by the way!


I then spritzed a very generous amount with my handy dandy Spritzer Bottle. I had already activated my Twinkling H2O's Thankful set from my previous attempts. I then added some with a brush in the approximate area of where each butterfly would be and let it spread on its own. It blended beautifully, and I am always freshly amazed at how shimmery it is.

I set it aside to dry and die cut two sets of the Memory Box Fairyland Butterflies - once in black once in white. I glued the two of them together first - offsetting the black just a bit for a shadow effect with Art Institute Dries Clear Adhesive.

Once the watercolor was dry, I went back and splattered a few drops of water to remove some of pigment - another great trick to give it a nice organic watercolor look.  I then glued the butterflies.

Since the butterflies took up most of the space, to add my sentiment, I stamped in blue pigment ink and then used Clear Detail embossing powder on Vellum and wrapped it around the watercolor layer. I always use Scor-tape to adhere the watercolor paper to the base layer because it is so thick and usually a little bit warped. The stronger the adhesive the better - or it might just pop up a corner after a day or two!  I also added some Clear and Water Dew Drops...really going with the water theme today!


Click any of the links below to be taken to the products from the Classy Cards 'n Such shop.

Thanks for stopping by!!! Until next time...


Pin It