Showing posts with label Bow-Easy. Show all posts

Saturday, December 19, 2015

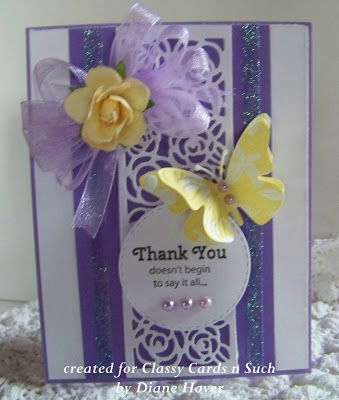
Thank You

Hi Diane with you today and guess what?  I have something besides a Christmas card to share..lol!


I have always loved the colors of lavender and yellow together. I started the base of my card with a lavender card stock. I added a white panel to that. I used another piece of lavender card stock under a die cut from Sue Wilson's Mini Striplet Rose Garden.

I ran two strips of Scor-Tape 1/4" down each side, then sprinkled Sparkle 'n Sprinkle Lacey Lilac Glitter on each strip. Next, I made a bow using the Bow Easy tool, and adhered a Rose to the center.

The stamped sentiment is from the JustRite Thank You Daffodil stamp set. A butterfly was added using Joy! Crafts Butterfly Trio. To finish, I added a few pretty Lavender Pearls.

Thank you for visiting with me today and have a Merry Christmas!!

Come back tomorrow, and we will have a new CCNS challenge for you. It will be Challenge #116 - Silent Night, Holy Night. There are beautiful cards just waiting to inspire you by the CCNS Design Team.

Thanks for stopping by!!!  Until next time...


Pin It

Monday, November 16, 2015

Always Thankful

Diana here today!  We had some good rain here. Though there are still some beautiful spots out there, winter is definitely making a presence. I'm still getting out some fall beauties in my craft room to share.


I just got the Spellbinders Decorative Curved Square, and this quote from my stash. To set off the beautiful curves and cutouts of the die, I sponged some yellow and green distress inks/stains (Evergreen Bough, Wild Honey, Peeled Paint), on white card stock.

To add more fall colors, I added some leaves (Spiced Marmalade, Evergreen Bough, Wild Honey, and Fire Brick), from the Impression Obsession Small Leaf Set covered with ultra thick embossing powder. 


I stamped the sentiment on white card stock, traced the opening in the die, hand cut the wonky square, sponged the edges, and popped it up with Joy! Small Foam Pads. I also added a double bow with Seam Binding. You can take white seam binding, add any color ink to it, and you have a beautiful seam binding to go with your project! Wrap it around the Bow Easy, to make beautiful bows!!

Thank you so much for looking! Don't forget to count your blessings!


If you are unable to find an item in the store, or would like something special ordered, please email me at beverly@classycardsnsuch.com. 

Thanks for stopping by!!! Until next time...


Pin It

Monday, October 26, 2015

Elegant Christmas

Hello, crafting friends!  It is Shirley here today, with a card that I have made for Challenge #108 Squirrel-y Friends. Make a friend card and add a squirrel or a bird.


I started my card with a white card base. I cut another white layer and embossed it using the Darice Doily Lace  embossing folder.

Next I chose two stamps to stamp my sentiment. One of them had My Friend on it, and the other one had Merry Christmas. I aligned them on my block, stamped them in Versamark and followed with Gold Detail embossing powder. This is a great way to stretch your stamps.

I took the Impression Obsession Pine Branch die to cut the white pine branches. I attached them to my card using Art Institute Dries Clear Adhesive.

I used Gold shiny card stock to cut my birds using Bird Song Dies  Secret Treasures Collection. I attached the gold birds to the branches, also using the Art Institute Dries Clear Adhesive.

My finishing touch to my card was to make a bow with gold ribbon and using the Bow Easy. This is a great tool for me because I cannot tie pretty bows.

I hope you will join us for the challenge this week.  Beverly always has a nice prize for the winner.


Join the Classy Cards newsletter list in the upper left column of this blog and receive exclusive weekly deals not available elsewhere! A one-time 20% discount on an order of your choice! Subsequent orders receive a 10% discount. Don't miss out, join today!

Thanks for stopping by!!! Until next time...


Pin It

Thursday, October 1, 2015

All Things Beautiful

Hello, Diana today combining some of my favorite toys.


I started with the large stitched die from MFT Blueprints 13 die set, and cut the Kraft card stock with it. I embossed the Kraft with a Sizzix wood grain embossing folder.

Next, I used a stamp from the ODBD Faith stamp set, and cut it with the bracket tag die from MFT Blueprints 13. 

I then added the leaves from the Impression Obsession Small Leaf Set. I popped up the leaves with Joy! Small Foam Pads, and tied it with some twine.

I also made a tiny bow using the Bow Easy and glued it on with Art Institute Dries Clear Adhesive. 

That's it for today! We hope you will take our challenge each week!


Don't forget to check out the NEW section at Classy Cards 'n Such. Release from 2015 collections are being added every day! When you check out, don't forget to enter your discount for a great savings!

Thanks for stopping by!!! Until next time...


Pin It

Friday, September 4, 2015

Colorful Poppy

Hi everyone, it is Shirley  posting today. Wow, it is September already, the summer just flew by!

We are sure heading into fall very quickly. I love the fall, but I do not like the winter that follows. I am hoping we are not going to have a winter that is really cold or snowy, but that is what is being predicted.

Let's move on to the card I have made to show you. It is bright and happy, I like happy and colorful cards.  How about you?


I started out using a black card base. I cut a white layer of white card stock and embossed it using the Dots embossing folder.

I took a piece of water color paper  and misted it with water in a Spritzer Bottle. I sprinkled Ken Oliver Alizarin Crimson Color Burst over the card. I used my heat gun to blow the water around on the water color paper and also dried it.

I stamped the Heartfelt Creation Blazing Poppy Vase over the top of the Color Burst water color paper. I used water color crayons to color over the poppy and the greenery, and used a paint brush with water to blend it. Next, I used a circle die to cut out the poppy. I layered it over a black and white scalloped circle. I added Black and Silver rhinestones on the side of the image.

I decided that I needed a border, so I added the Our Daily Bread Designs Beautiful Borders die. I adhered the border and the circle image to my card using Art Institute Dries Clear Adhesive. Next, I used my Bow Easy to tie a black and white checked bow. I attached the bow to the border, using glue dots.

I am happy you stopped in this morning. Come back this afternoon to see another fabulous card!

Have a great weekend. 


There is still time to join our Classy Cards 'n Such challenge. Click on the Current Challenge tab on the right side of the blog for all the details. Come and join the fun!

Thanks for stopping by!!! Until next time...


Pin It